

Monday, December 17, 2012
December Cards - Card #1
Today I want to share the first of three cards we made at my recent December Cards, Cards, Cards Stamp Camp - it uses Jolly Bingo Bits and I think it's adorable. Everyone needs Thank You's for the Christmas gifts - so I wanted to make some. The Thank You is from Cute and Curly - another of my favorite sets. The colors are Whisper White, Riding Hood Red and Gumball green. The gem on the top of the tree and the three on the holly were colored with Sharpies to get the yellow and red tones. This is a great layout to use when you are using those tiny stamps like the ones from Jolly Bingo Bits!
 Hope you enjoyed - stop back tomorrow for card #2, and plan to join us on January 8 for my next Cards Stamp Camp - email me now to RSVP! ~Maureen


Sunday, December 16, 2012
Tree Clothespin Clip
So today I want to share our 3rd Make and Take from our Holiday Open House - it's an adorable, quick and easy decorated clothespin - perfect for closing a Christmas package or how about topping a bag of homemade cocoa or snowman soup?!? Love it!!


1. Using Tombow Glue attach strips of DSP to front and back of Clothespins.
2. Stamp tree and remove green from trunk with wet Qtip. Marker trunk with brown and stamp.
3. Using framelit - cut it out on the Big Shot.
3. Attach tree to clothespin with 2 dimensionals.
4. Punch star out of Cherry Cobbler and attach to tree with glue dot.
5. Add a gem to middle of star.
THIS IS A GREAT CRAFT TO USE UP ALL YOUR STRIPS AND SCRAPS OF CARDSTOCK AND DSP!! ~Maureen
Saturday, December 15, 2012
Holiday Gift Bag
Here is the second Make and Take from our Open House last week - what a great way to use up those 1/2" scraps of DSP.

 ~Maureen

1. Choose a brown tree stem 4" x 1/2" and tape to bag with tape on top, middle and bottom on stem.
2. Choose Designer Series paper strips of each size (1", 2", 3", 4", 5") and tape as shown on your bag - no need to keep straight - these are crazy trees :) Use a small piece of tape on each end and in the middle of each strip.
3. Choose a treetop star and attach to bag with a glue dot. Add a gem for some sparkle!
4. Stamp "Merry Christmas" on white layer and tape to brown layer - all done!
Here are a bunch ready to fill with Christmas goodies.
Friday, December 14, 2012
Clearance Rack Blitz plus Ribbon Bonus

 |
| Primrose Petals Shown |
Quick and Easy Gift Tags
This was our first Make and Take at our Open House last week - a set of quick and easy gift tags for your Christmas gifts -

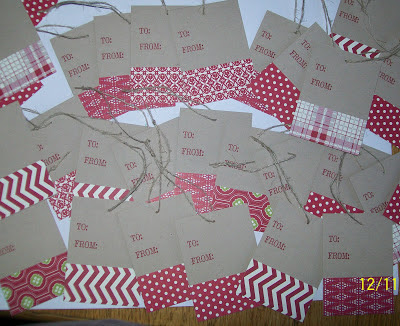

1. Take a 2 3/4" x 6" piece of Crumb Cake and a 1" x 6" piece of Holiday DSP
2. Put a strip of 2 sided tape along the middle of the back of the DSP and tape down to the bottom of your piece of Crumb Cake (or other cardstock.)
3. Cut linen thread 6" long.
4. Then cut the strip of Crumb Cake into 3 - 2"x 2 3/4" pieces as shown in picture.
5. Stamp "To: From:" on Crumb Cake tags with a coordinating stamp color.
6. Punch a small hole in the top of each of your tags as shown, and feed the linen thread
through and tie. Voila - tags in an instant.
YOU COULD DO THIS WITH 12" STRIPS AND CREATE YOU TAGS FOR CHRISTMAS VERY QUICKLY!!

So here are all mine - I just need to add names and add to my packages :) ~Maureen
Thursday, December 13, 2012
More on Lois' Tree
I wanted to share a bit more today on how I made this Christmas Bulb Tree for my Secret Sister Lois. I found a picture of something similar on Pinterest and had to try it. You purchase different sizes of coordinating bulbs and then put them on a knitting needle - yes you heard correctly :) - to make the tree. I used an empty ribbon spool as my base - I put the needle through it and glue gunned it to hold it in place - then glue gunned that entire base to the center of my red charger.
.JPG) Then after putting all the bulbs on the way I wanted - I created a tree skirt using our medallion die and some coordinating paper. I put the skirt around the bottom of the tree and glued it in place.
Then after putting all the bulbs on the way I wanted - I created a tree skirt using our medallion die and some coordinating paper. I put the skirt around the bottom of the tree and glued it in place.
 Then I used a stencil and traced and cut out two of the glitter stars for the top of the tree. I used glue dots to secure each of the points together - then slid it down over the top of the knitting needle. It was my first attempt, and not perfect - but I was happy with it and I hope Lois liked it. A special gift for a special friend. ~Maureen
.JPG)

Wednesday, December 12, 2012
CSL gifts - Final Installment
 |
| So here is my tree up close - it is wrapped newsprint and glitter paper to make this beautiful tree - with spritz and gems for decorations - I love it!! |
 |
| Here I am with my lovely Christmas tree from my daughter, Heidi - I can't believe she was my Secret Sis all year long - and I didn't even know it! Makes me wonder what else she is being sneaky about :) |
 |
| Here's Maureen S's exchange gift from Kathy W. |
 |
| Sandy with her little Christmas tree and Ornament set in a handmade package from Secret Sis Virginia! |
 |
| And Virginia with her adorable Handmade Christmas tree and card from Secret Sis Sandy - they had each other :) |
Tuesday, December 11, 2012
CSL gifts - Part V
Few more fun gifts...
 |
| Here's Laura modeling the beautiful hand-made necklace she received from Anita. |
 |
| Lois with her Christmas Bulb Christmas tree with medallion tree skirt made by yours truly. |
 |
| Maria with her "Christmas Story" ornament and dimensionals from Darlene. |
Tomorrow is our final gift reveal. ~Maureen
Monday, December 10, 2012
CSL gifts - Part IV
Another round of great gifts -
See you tomorrow ~Maureen
 |
| Here are the beautiful hand-stamped coasters that Kathy B received in the gift exchange from Laura. Kathy had to leave early so was not in the picture! |
 |
| Kathy S got this beautiful tea set and hand stamped card and bag from Elaine. |
 |
| Here is Kathy W. with her decorated coffee thermal mug and beautiful hand-made package and card from Kathy B. |
Sunday, December 9, 2012
CSL gifts - Part III
Here we go with another round of gifts ~Maureen
 |
| Here is Elaine's with her adorable tissue holder from Christel, using our Storytime paper. |
 |
| Heidi's is a Secret Sister gift so a bit more - Julie made her this great apron in a jar using our SU fabrics - how cute is that! |
 |
| Here is Karen's great Secret Sister gift from Lois - it's a pot with paperwhite bulbs in it for the holidays - and a set of our adorable SU ornaments from Convention. Karen was not able to make it, so wasn't able to be in the picture. |
Subscribe to:
Posts (Atom)