Showing posts with label Halloween. Show all posts

Saturday, September 26, 2020

Hopping Around the World Blog Hop September -Halloween Fun!

Once again, so very happy to be hopping with this lovely group of stampers for the month of September as we share some Halloween fun with you.  Be sure to hop on through the links at the end for some SPOOKY inspiration.

~*~*~*~*~

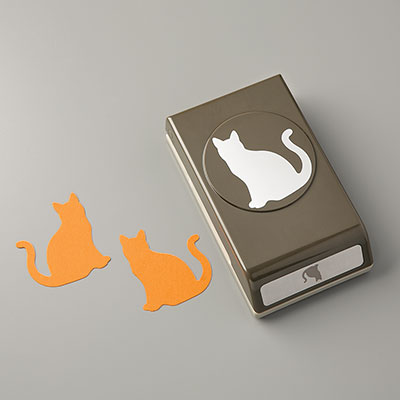
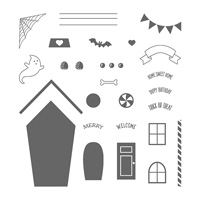
For my card today - I chose to make a simple spinner card - this was a request by a member of one of my technique club members - so why not go Halloween! This bat was just calling out to me saying it wanted to "spin" lol!

I used Stampin' Up!'s linen thread, Memento Ink, Cajun Craze marker, the Hallows Night Magic set and coordinating dies from the bundle. And for the card above I cut the bats out of the coordinating Magic in the Night DSP - 

Magic in the Night DSP #153517 $11.50 USD
Simple Spinner Instructions - Start with an A2 card base and a DSP layer that is 5 ¼” x 4”.  Layer the DSP lightly on the front of the card base with a small amount of snail or seal (1/4” to hold temporarily).  Cut through both layers with a punch or die cut to make a window opening.  At the top of the opening on the card base front only, secure one end of the twine with strong adhesive.  Next punch/cut two symmetrical images (you can also layer images on a square or circle, etc.).  Adhere these back to back on the twine in the center of the opening, so that it will be able to spin freely.  Then secure the other end of the twine with strong adhesive to the bottom of the opening.  Layer your DSP layer on the front to cover the twine – it should line up perfectly.  Decorate card as desired.  Twist the image about 5 times before closing card – when you open it, image should spin freely.
Above is the same card - but for this one I stamped and die cut the bat images on Whisper White, rather than cutting from the DSP - kind of a positive and negative contrast in them.
And here's the card open -  you can see how the big bat freely would spin, and there is a strip of white with a creepy spider image where you can write your sentiment.  Of course, if you wanted to write more - you could always add another panel to the back of your card.  These and fun and easy to make and could be duplicated in any theme. Try one and let me know how it goes!
 
~*~*~*~*~

Now be sure to "hop" on through the rest of the blogs on the list below to see all their great takes on this same sketch.  Before moving on, be sure to leave me a comment at the bottom of this post - they make my day!  
A little bit crazy and always stampin' ~ Maureen

~*~*~*~*~  


If you do not have a current demonstrator and would like an annual or mini catalog - be sure to let me know.  
To order any of Stampin' Up's products you can go directly to my online store -www.stampingwithmaureen.stampinup.net and click on SHOP NOW.  
Please use my current hostess code EXQWMY9U before checking out to get full benefits from me as your demonstrator*   


*NOTE: If your personal order is not part of a current party and you are ordering over $150 in merchandise - please do not use this code.  Your order without the code will qualify you to earn a minimum of 10% in hostess benefits.  

Thursday, October 31, 2019

Halloween Pop-Up Coffin - treat box

So last week I shared another version of this coffin box from Stampin' Up!  It has been so much fun playing with these boxes and making up treat containers for my grandkids to enjoy.
Today I'm sharing a POP-UP version.  First I decorated the top of the box with some Designer Series paper  - I got a simple template by tracing around the box top and cutting out in cardboard so I could reuse it.  Next I added a few components from the September Paper Pumpkin kit to decorate the lid.
But what is really fun about this treat box, is that when you open the lid - up pops this little Paper Pumpkin kit skeleton.  How fun is that.  He is just attached to the inside of the box with some acetate.  After you fill the box with treats - bend mister skeleton back and close the box - when you open it - this is what you will see :)
 ~*~*~*~*~ 

  To order any of Stampin' Up's products you can go directly to my online store -www.stampingwithmaureen.stampinup.net and click on SHOP NOW.  Please use the Hostess Code below to get full benefits from me - UAKPA4G2.  Thank you! 

Tuesday, October 22, 2019

Ghostly Skeletons from September's Paper Pumpkin Kit!

Today I'm sharing another fun alternative card that we made using the September Paper Pumpkin kit - as I mentioned last time - this kit comes right to your door.  It's different each month - but each month is great!  It can be treat boxes, cards, 3d items - but what ever it is - it will be great and you will be able to find a ton of creative alternative ideas online.  So here are the components of the September kit -
And here is one of the alternative cards we made.  I used a white card base, layer of Basic Black cardstock, and then we stamped the Pumpkin Pie layer with Black Memento ink using the Buffalo Check background stamp.    After the ink dried we added several images of skeletons using versamark to give them that ghostly look - before adding our other card components.

Here is a close up of those little skeletons - I just love the look for Halloween.

To sign up for Paper Pumpkin to come directly to your home - you can CLICK HERE!  You can pay month to month or just have it come as a monthly subscription.  All of my subscribers are invited to join me for a special Paper Pumpkin class each month where we can put our kits together and do alternatives if we like; plus they get a BONUS alternative project.  Or if you can't make the class and are a subscriber of mine - I will send you the alternative projects by email after class.  Stop back soon - I'm participating in a Christmas Card blog hop around the world - on Saturday!  ~Maureen

~*~*~*~*~ 
 
To order any of Stampin' Up's products you can go directly to my online store -www.stampingwithmaureen.stampinup.net and click on SHOP NOW.  Please use the Hostess Code below to get full benefits from me.  Thank you! 

Saturday, October 19, 2019

Scary Paper Pumpkin Banner

Today I'm sharing a quick post that features a cute little September Paper Pumpkin kit alternative.  Below is the kit components we received.  It was made to make little treat boxes - but you can use it for so much more.  This kit comes to you monthly in the mail - each month features different projects - and if you haven't yet tried it, well, you just need too!  November's kit is a set of 24 Christmas gift tags - and they promise to be beautiful - but you must sign up by 11/10 to get yours - here's the LINK!

As soon as I saw those purple and black tags and the mini black clothespins - I immediately thought BANNER!
So we took the tags and alternated the colors - added the letters for SCARY - and a couple cute stamped skeletons for good measure - and created this adorable Halloween banner.
It is very lightweight - so here it is hung up on the bottom of a picture frame with just a couple glue dots.  When Halloween is done, I can pull off the glue dots and put away till next year.
Hope you liked this fun Paper Pumpkin alternative - stop by over the next few days as I share more Halloween ideas - and get your SPOOKY Crafting On!  ~Maureen
 
~*~*~*~*~ 
 
To order any of Stampin' Up's products you can go directly to my online store -www.stampingwithmaureen.stampinup.net and click on SHOP NOW.  Please use the Hostess Code below to get full benefits from me.  Thank you! 

Thursday, October 17, 2019

Halloween Lined Coffin Treat Box

Just look at these Treat Boxes Stampin' Up Has for Halloween - they come together in a jiff with just a little extra sticky tape and glue dots.  They come 12 to a package for only $7.00 and if you order now you'll still have time to get and decorate for Halloween.  You can find them on page 53 of the Holiday catalog - product #150451.
We had a treat box class this week and my customers that attended got to make two of these.  After putting the boxes together we used a piece of the Monster Bash Designer series paper (pg 53 #150447) to trace the lid and cut out.  Sponged the DSP with Memento ink and adhered with snail to the top of the box. 
Then we stamped the little Dracula from the Spooktacular Bash stamp set (pg 53, #150544), and colored the border with a Real Red marker.  Next we cut him and the beautiful frilly frame out, using the Ornate Frames dies (pg 53, #150664).  Layering the frame with snail and popping Dracula up on dimensionals.  You can get the Spooktacular Bundle (set and dies) at a 10% discount by using item number #153040.
The last step - that really completed the box for me - was that using extra sticky tape, we lined the box with Real Red Ruched Ribbon - it was all satiny and coffin like.  Just a great touch - and the ribbon is beautiful for using with all your Christmas holiday projects.
Hope you like this treat box - stop by over the next few days as I share more Halloween ideas - and get your Crafting On!  ~Maureen
~*~*~*~*~
To order any of Stampin' Up's products you can go directly to my online store -www.stampingwithmaureen.stampinup.net and click on SHOP NOW.  Please use the Hostess Code below to get full benefits from me.  Thank you!

Saturday, October 6, 2018

Halloween fun!

So - it's getting spooky around here...my grand-daughter Zamarah and I took some time this weekend to put up some of my Halloween decorations.   The cards are from friends, and the cute little bat candy jar is from my sister-in-law.
This has gotten me in the mood for some more Halloween card-making - so today I've been working on making up a bunch of cards for an upcoming vendor event on October 20. I am also doing a custom order for a friend - so lots of spooky card-making going on here.
Below is a close of up just one of the designs.  This is also the card we made at a recent Halloween stamp camp.  I really like how it turned out with that buffalo check background.

Just spooky enough to send out to all your little ghosts and goblins.  Just a reminder that I sell my cards for $4.00 each or 3/$10.00 plus postage if necessary.  I also do custom orders - so contact me if there is something special you are looking for. 

Don't forget that Sunday is the last day to order from the specials on the World Card Making Day Sale - check out more details HERE -
http://crazystampinglady.blogspot.com/2018/10/celebrate-world-card-making-day-all.html
You can order online at www.stampingwithmaureen.stampinup.net - click on SHOP NOW and be sure to use this hostess code - 
See you soon! ~Maureen

Tuesday, October 31, 2017

Happy Halloween!!

So much fun - my Technique CLUB 1 made this adorable project as their renewal thank you for our next round of club.  It was tons of fun to design, and I think they turned out super cute!  I purchased the black frames at a local craft store, and removed the glass so we could pop up some images. 
After checking Pinterest for tons of Halloween sampler ideas - I came up with the panels above and below.  The orange hat, the front gravestone, the small pumpkin and one of the bats are all popped up to give it that great dimension.
Here it is from the side - where  you can see (maybe) some of those images popped up. 
I love holiday samplers - they are such a cute and fun addition to your decorating.  Have a Happy Halloween - and be careful out there!!~Maureen
Click on any image below to go directly to my online store -