Showing posts with label Wreath. Show all posts

Wednesday, October 19, 2022

Paper Crafting Blog Hop October 2022 - Thinking of you!


Welcome to our Paper Crafting Blog Hop for October 2022 - featuring talented Independent Stampin’ Up! Demonstrators from all over the globe including the USA, United Kingdom and Australia. We have a wide array of projects and design styles to share with you this month - all about "Thinking of you!"

~*~*~*~*~

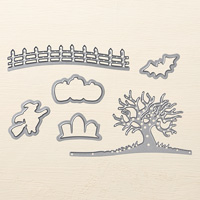
I love fall - the crispness in the air, the food and drinks, cinnamon and apples - but mostly the changing leaves. We were fortunate enough to be in Tennessee and West Virginia last week and witness the beauty first hand - so as I created today, that was on my mind. I started with one of the smaller branches from Forever Fern - and using a mask cut with our Layering Circles dies out of post-it paper - I created a wreath.

This is so simple to do, and creates such an impact when you remove the post-it!

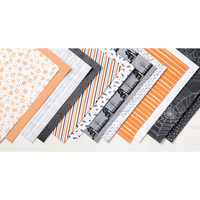
Then I cut out layer circle of the same three colors - Cajun Craze, Pumpkin Pie and Old Olive - and created a focal point in the middle of my wreath.

This set didn't have a "thinking of you", so I pulled out my Soft Seedlings set - which had a perfect one. Wrapped it with a little linen thread and tied a bow - then added some of our Champagne Rhinestone gems. Just so beautiful in it's simplicity.

Of course - I had to decorate the envelope to match and I love how it turned out.
So what do you think?  I love it - perfect colors for this time of year - and who can't use a few more thinking of you cards, right?

I hope you got some inspiration from this card. Thank you so much for stopping by and I would love to hear your thoughts and comments!

~*~*~*~*~

Now click on through to the rest of those hopping with me this month to see all of their wonderful creations and inspirations! ~Maureen

~*~*~*~*~
To shop for the supplies used in today's project Click Here -  https://s.tamp.in/jDrW8C
To order any of Stampin' Up's products you can go directly to my online store - www.stampingwithmaureen.stampinup.net  and click on SHOP NOW.  Please use the Hostess Code (EYGKKCBT) to get full benefits from me.
*~*~*~*~ 
  *NOTE: If your personal order is not part of a current party and you are ordering over $150 in merchandise - please do not use this code; as your order without the code will qualify you to earn a minimum of 10% in hostess benefits.   

 ~*~*~*~*~

October Bundle Bonus


Proceeds from every purchase of this bundle during the month of September 2022 go to support the  Agape House of Prescott AZ 
Plus, you will receive my Bundle Bonus Tutorial (sent the Sunday following your order) featuring great projects made with this bundle. Order using the hostess code above to get these benefits!

 ~*~*~*~*~

If you don't currently have a demonstrator, and would like a catalog or to learn more about Stampin' Up! and our products, please email me at crazystampinglady@gmail.com

*Note: Product pricing varies by market.  Check with your local demonstrator if you are not in the U.S. to find out your cost.  Product active to purchase at the time of this post.

Sunday, March 3, 2019

Paper Flower Wreath!

So everywhere I look on Pinterest I see these awesome hoop wreaths that use one or both rings of an embroidery hoop for their base.  For my latest club renewal I wanted to try my hand at making one with all paper flowers and Stampin' Up! products, and this is what I came up with.  I love how it turned out - perfect for this SPRINGY time of year.
Since it is a Technique Club - these paper roses were our technique for the month.  But the group got to make some other fun flowers for the wreath too.  Plus we used some great punches and ribbons to fill out the clusters.
So below is the daisy - we punched three daisies and curved the leaves then attached together with glue dots as shown below.  We then punched two small flowers and layered them for the center along with a gem.
For the small posies it was two medium sized flowers punched and layered with a single small and a pearl for the center.
This butterfly is from the Springtime Impressions thinlits.  We cut it out of Petal Pink - sponged the edges with Lipstick, curled the wings a bit and added some gems for the body.
 
Finally we made our roses - punched six hearts and two scallop circles.  Sponged all the edges and cut slits in the scallops as shown.  Then everything was spritzed with water, and layered onto the brad - first the scallops, then the hearts.
We folded each layer up tight to the center - taking one layer at a time.  Scrunching it all together tightly.
Then we gently re-opened each layer until we saw our roses forming before our eyes.
The final step was putting it all together on our wreathes - here's the group proudly displaying their works of art!
Here again is my completed project.  I have it hanging on my wall as in the first picture of this blog post.  But it could also be displayed on a pretty easel - or even mounted in a shadow box.  It was a lot of fun to make - so I made another for my mother-in-law to put on her door at the care facility she lives in.
Here is a copy of the Technique card we added to our books - 

You all need to try your hand at this fun project and see what you can come up with!  Enjoy!  ~Maureen

Remember it's currently Sale-a-bration where you can earn FREE merchandise with every $50 purchase.  Just click HERE for full details; and then click on SHOP NOW to see the catalogs.  Or if you'd like a hard copy of our Annual catalog, Occasions catalog and Sale-a-bration catalogs mailed to you, just let me know.  If ordering online please use my current hostess code - 

Monday, September 19, 2016

"BOO" wreath for Halloween

Yesterday I had my Halloween wreath class and it went great!  Here is the picture of the project we completed - it measures 18" diameter.   The project was made by adhering 12"x1" strips of DSP, glitter and black cardstock (11"x1") folded and overlapping, around a 6" wooden embroidery hoop.  You can use either piece of the hoop to do this, so you can actually make two with one hoop.
Once all the strips are adhered with SU's tear tape, we flagged the end of each of the pieces.  The next step was to build the scene.  We took a 6 1/2" circle of Pumpkin Pie - added a 2" circle of Daffodil for the moon, then sponged some black ink on to make spooky clouds.  We then added the TREE edgelit and FENCE edgelit from Halloween Scenes Edgelit dies.  The tree was adhered to the orange circle - then that was glued to the back of the wreath.  Next - using two glue dots we put the fence on the front of the wreath curving it just a bit to give dimension.  (see picture below)
After that we added our four bats (one up on the ring of the wreath) to our moon with glue dots.  You can see we folded the wings up and back again so they would pop up a little.

Here's a view from the bottom so you can see how the fence pops up.  Final step was to add the BOO of orange glitter letters and a hanger to the back.  Fun project - and it looks great on my wall!  See you soon.  ~Maureen
Click on any product image below to go directly to my online store - Be sure to use this month's Hostess code -

Wednesday, November 18, 2015

Fall Decor - with a couple cute projects

So the beginning of November I took down Halloween and put up my Fall/Thanksgiving decorations.  A lot of things carry over which is nice - but this wreath is a new addition.  We made the wreath and the cute little inside hanging scarecrow at the Fall 2015 Stamp Camp.  It has other hanging decorations so it can be used all year - I'll try to remember to show as I change them out.  The flowers and most of the parts of the scarecrow were cut out on the Big Shot and many of the layers were embossed with embossing folders.
I used the same fall leaves but took out the Halloween picks and turned around the jar that said Happy Halloween - so now it just looks like fall.  Then through in a cute Thanksgiving candle and Pilgrim bear.
Took away some Halloween stuff and put out this adorable cross-stitch Thanksgiving picture - made by my former sister-in-law.  The adorable birdhouse stayed - as it works - that was made my my downline, Maria!
Here's a close-up of the scarecrow - although a little blurry when I zoomed in.
And here is where I put the wreath.  The witch hat from last month is gone and this beautiful fall flower arrangement is there in it's place.  Took the three pumpkins that said Trick or Treat and turned them around so they are just now 'fally' - Really love how this looks in my entrance.
If you want to see how it looked for October to compare click on THIS POST.  See you soon - have a great day!  ~Maureen

Friday, November 28, 2014

New Holiday Wreath

This week we've been blessed to have Jenee and the kids visiting and she brought me this amazing wreath that she made for me.  I love it - exactly my style.  The little berries look like they are glowing.
But you can see here - they are frosted and beautiful.
Here is a close up of some of the trim - fabric and burlap roses and pieces she added - so rustic and so lovely.
It's definitely an indoor wreath and I wanted everyone to see it as they walked in, so I hung it up above in our entry way.  I know it hangs below the crossbar - but I love the way it looks there.  

Thank you so much Jenee!  ~Mom