Showing posts with label Technique. Show all posts

Wednesday, October 20, 2021

Paper Crafting Blog Hop October 2021 - Anything Fall!


Welcome to our Paper Crafting Blog Hop for October 2021 featuring talented Independent Stampin’ Up! Demonstrators. Fellow demonstrators from all over the globe including the USA, United Kingdom and Australia are participating. We have a wide array of fun projects and design styles to share with you this month - all spotlighting projects that represent - anything Fall!

~*~*~*~*~
Fall is definitely my favorite season - apple cider, trees turning colors, warm days and cool nights. So I made a card to reflect that feeling.

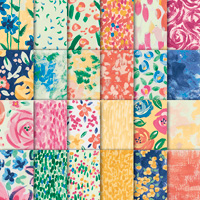
The sentiment is from a Christmas set, but it worked perfectly for fall for me. To make this card I used the Bargello technique taking strips of the amazing Beauty of the Earth DSP and adhering it to self-adhesive paper, then cutting that in strips to get all these beautiful colors.

Next adhere these strips to another piece of self-adhesive to get a beautiful layer of mosaic like design.

I then used the stitched leaves dies to cut out leaf images -
and using the negative image - popped it up with dimensionals on a card base of Merry Merlot to get this beautiful card -
I gave the sentiment a little curve with a bone folder and adhered it with glue dots, and dimensionals to raise the center. Added a little twine bow. Then finally - I finished the inside with one of the cut out leaves.

Hope you like the card as much as I liked making it - my ode to FALL in the form of a beautiful card. Would love it if you'd leave me a comment on what you think.
~*~*~*~*~
Now click on through to the rest of those hopping this month to see all of their wonderful creations! ~Maureen

To order any of Stampin' Up's products you can go directly to my online store - www.stampingwithmaureen.stampinup.net  and click on SHOP NOW.  Please use the Hostess Code C4KG6QKP to get full benefits from me -
~*~*~*~*~ 
  *NOTE: If your personal order is not part of a current party and you are ordering over $150 in merchandise - please do not use this code; as your order without the code will qualify you to earn a minimum of 10% in hostess benefits.   

 ~*~*~*~*~

If you don't currently have a demonstrator, and would like a catalog or to learn more about Stampin' Up! and our products, please email me at crazystampinglady@gmail.com

Wednesday, February 26, 2020

Paper Toile

So today I'm sharing some instructions - and samples of the Paper Toile technique.  It is really, simply layering different layers of your image glue dots or dimensionals to give it more dimension.  Here is the instructions sheet from one of my clubs.
You can see in the photo below, how we layered the balloon -
Here is a card made with the same technique - It was done using the large Magnolia flower image and stamping it several times and cutting out different layers.
You can see those layers below and some of the water coloring as we start to put it together.
With this flower we used the bone folder as well as the dimensionals - so we could curve the leaves and petals up and make the flower look like it was coming up off the paper.
And here it is again from the side view.
I hope you liked this technique and will leave me a comment letting me know what you think.  ~Maureen 
~*~*~*~*~
To order any of Stampin' Up's products you can go directly to my online store -www.stampingwithmaureen.stampinup.net and click on SHOP NOW.  Please use the Hostess Code below to get full benefits from me.  And remember - it's Sale-a-bration - so a $50 purchase will earn you a free product from the SAB brochure.  Thank you! 

Wednesday, June 12, 2019

Beautiful Bokeh

So I have loved this technique for years - but I forget about it.  Recently I had a club member ask about Bokeh and so I decided to play with it for our May Technique clubs.  Our finished product was this card below - using the now retired Dragon Dreams dies.
The technique is really pretty simple - you start with a base of color - in this case we used daubers to add a series of colors to a piece of WW cardstock till it was virtually covered with color.
Next I used a vellum template I made by cutting out circles using our layering circle dies in different sizes.  Using our craft white ink and working largest to smallest circle - we added circles of white right over the colors.  You can see in the picture below how the circles overlap and layer to give that Bokeh look and depth.
Here is another view where you can see the circles.  Now this is craft ink, so you need to let it dry completely.  I like air-drying better than the heat tool, as I think heating it mutes the circles more- but if you are in a time pinch - go ahead and heat it.
Then when you are done, you can stamp on it, or layer over it like we did in the first picture.
However you decide to finish it, I am sure it will be beautiful.  So go ahead, give this one a try!  ~Maureen
To order directly from me online, just click on any product image below and it will take you to my online store - be sure to use my hostess code below before check out to get full benefits from your shopping.  Note: if your order is over $150 pre Shipping and Handling and tax - do not use the code - as you will get some free merchandise directly from Stampin' Up! for an order that size. 

Sunday, March 3, 2019

Paper Flower Wreath!

So everywhere I look on Pinterest I see these awesome hoop wreaths that use one or both rings of an embroidery hoop for their base.  For my latest club renewal I wanted to try my hand at making one with all paper flowers and Stampin' Up! products, and this is what I came up with.  I love how it turned out - perfect for this SPRINGY time of year.
Since it is a Technique Club - these paper roses were our technique for the month.  But the group got to make some other fun flowers for the wreath too.  Plus we used some great punches and ribbons to fill out the clusters.
So below is the daisy - we punched three daisies and curved the leaves then attached together with glue dots as shown below.  We then punched two small flowers and layered them for the center along with a gem.
For the small posies it was two medium sized flowers punched and layered with a single small and a pearl for the center.
This butterfly is from the Springtime Impressions thinlits.  We cut it out of Petal Pink - sponged the edges with Lipstick, curled the wings a bit and added some gems for the body.
 
Finally we made our roses - punched six hearts and two scallop circles.  Sponged all the edges and cut slits in the scallops as shown.  Then everything was spritzed with water, and layered onto the brad - first the scallops, then the hearts.
We folded each layer up tight to the center - taking one layer at a time.  Scrunching it all together tightly.
Then we gently re-opened each layer until we saw our roses forming before our eyes.
The final step was putting it all together on our wreathes - here's the group proudly displaying their works of art!
Here again is my completed project.  I have it hanging on my wall as in the first picture of this blog post.  But it could also be displayed on a pretty easel - or even mounted in a shadow box.  It was a lot of fun to make - so I made another for my mother-in-law to put on her door at the care facility she lives in.
Here is a copy of the Technique card we added to our books - 

You all need to try your hand at this fun project and see what you can come up with!  Enjoy!  ~Maureen

Remember it's currently Sale-a-bration where you can earn FREE merchandise with every $50 purchase.  Just click HERE for full details; and then click on SHOP NOW to see the catalogs.  Or if you'd like a hard copy of our Annual catalog, Occasions catalog and Sale-a-bration catalogs mailed to you, just let me know.  If ordering online please use my current hostess code - 

Wednesday, August 29, 2018

Reverse Stamping and a step outside my comfort zone!

So - for our August Club we did Reverse Image Stamping as our technique for this month.  This is really super easy to do with our Stamparatus - but I wanted to demonstrate how easy it is to do with just our silicone mat.  So for club that was the route we went -

But then here is where (with a little push from my granddaughter Paisley) I stepped out of my comfort zone.  I did my very first YouTube video - I would love for you guys to check it out and subscribe to my channel - as this is the first of many to come.  At first I did not want to even post it, as I had my camera going the wrong way - but after watching it still works.  So --- I figure it was my first - and I'll be able to look back on it some day and laugh lol! Here it is below - and you can go to this link if you want to find it on YouTube and subscribe - https://youtu.be/JzjUN4Xe3qY
So here is the card I made with this little birdies from the video - I had seen another card with the hole cut out and some thing embossed behind it and it reminded me of a birdhouse.  I thought it was perfect for a wedding card - these two little chickadees are setting up house. The layer of Crumb Cake that is embossed is put on with dimensionals - so there is actually a little space between those layers - which I love.
Above you can see how I stamped the envelope - and here is the inside of the card - I left that embossed layer showing on the inside too.  I think it is really pretty and this side shows the debossed section of it.
To color my birdies I used the limited time set of watercolor pencils that is available for August.  Don't miss out on these beautiful colors if you like watercoloring - as they are lovely! 
Hope you all have an amazing, creative day!  See ya'll soon - and let me know if you try the Reverse Image stamping and how it goes!  ~Maureen
If you'd like to order just go to my website: www.stampingwithmaureen.stampinup.net and click on SHOP NOW and you can see all the details on this limited time set - be sure to use the hostess code below - 

Wednesday, August 15, 2018

June Clubs Sassy Sisters and Cardy Girls clubs - Heat Embossing

So our June technique for these two clubs was embossing. It was renewal month for my other club - so we did a different project that I'll post soon.  Here is our technique card for our binders -
It's an oldie - but a goodie - and I still love every time that embossing powder melts and gives your image an amazing shine.  It's like magic.  This year's annual catalog for Stampin' Up! has embossing powder in the five new fun In-Colors - Blueberry Bushel, Call Me Clover, Grapefruit Grove, Lovely Lipstick and Pineapple Punch.
They are so bright and vibrant and we used the Blueberry Bushel color on these cards below.
This card also features the Painted Glass stamp set and our beautiful Garden Impressions DSP.  How beautiful are these cards.  The layers of blue, white, blue and black - really make the focal point pop.  We colored the butterflies with markers - cut them out on the big shot with the Stained Glass thinlits, and folded their wings up and attached with a couple glue dots.
The words are embossed and thus really bright and shiney!  Just loving this entire card - and hope you do too!  See you soon - next participating in a Fall Blog Hop - then after that Day 5 of my Alaskan Cruise.  ~Maureen
~*~*~*~*~
You can order all of the supplies to make these cards on my website - just click on any of the product images below to go right to my store.  Don't forget it's BONUS DAYS - so for every $50 you spend in one order in August, you'll receive a $5.00 email coupon to use in September.  Please be sure to save those emails, as they cannot be replaced!
Please use my current Hostess code -