Showing posts with label 2021. Show all posts

Monday, January 24, 2022

December 2021 Paper Pumpkin Alternatives

Hi all - so I'm changing up my Paper Pumpkin offerings a little as most of my subscribers live out of my local area.  I will no longer be offering an alternative class.  Instead - each month I will do a Blog post showing the alternatives I have come up with.  I will also send out a FREE PDF of the projects with instructions to all of my current subscribers for the month.  Here are my alternatives for the December 2021 kit - enjoy! ~Maureen

 ~*~*~*~*~

Alternative #1 – Cherry Sweet Card

Alternative #2 – Flower Hello
Alternative #3 – Go Bananas Easel Card

Alternative #4 – Post it note refrigerator holder


Coming to your mailbox in February 2022 

Order your kit by February 10, 2022

~*~*~*~*~

To order any of Stampin' Up's products you can go directly to my online store - www.stampingwithmaureen.stampinup.net  and click on SHOP NOW.  Please use the Hostess Code 2FKZNR64 through Jan. 31, 2022 to get full benefits from me -

~*~*~*~*~ 

  *NOTE: If your personal order is not part of a current party and you are ordering over $150 in merchandise - please do not use this code; as your order without the code will qualify you to earn a minimum of 10% in hostess benefits.   

 ~*~*~*~*~

If you don't currently have a demonstrator, and would like a catalog or to learn more about Stampin' Up! and our products, please email me at crazystampinglady@gmail.com

Wednesday, December 15, 2021

Paper Crafting Blog Hop December 2021 - Gift Packaging!


Welcome to our Paper Crafting Blog Hop for December 2021 featuring talented Independent Stampin’ Up! Demonstrators. Fellow demonstrators from all over the globe including the USA, United Kingdom and Australia are participating. We have a wide array of fun projects and design styles to share with you this month - all spotlighting projects that represent - Gift Packaging ideas!

~*~*~*~

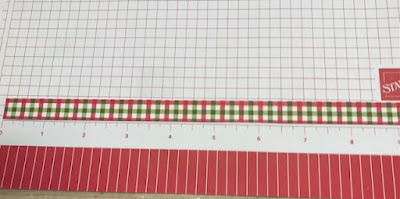
So today's project is a Holiday Gift Packaging idea - that could easily be adapted for any time of the year just by changing out the Paper you use. Start with strips of your favorite DSP -
For this bow all DSP strips are 1/2" wide - and you'll need 3 - 11" long; 3 - 9 1/2" long; 2 - 6" long and 1 - 4" long.
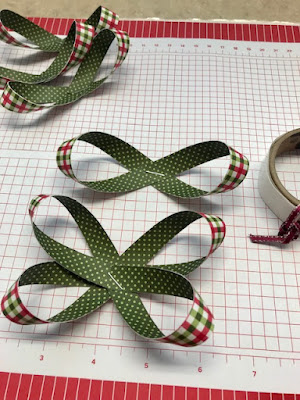
The next thing you will do is fold each piece (except the 4" piece) in half to find the center point. Then loop each end to the center and staple it.
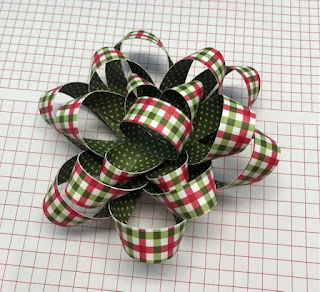
The above image shows one looped and then two attached together with glue dots. Be sure your ends are rounded as shown above, and each piece folded to the center overlaps a bit before stapling. You are going to attach the 3 largest together, then the 3 next largest, then the 2 next largest - criss-crossing them as shown. The 4" piece is stapled together in a circle and attached to the center to finish off the bow. I used only glue dots to attach each layer and it's staying together nicely!
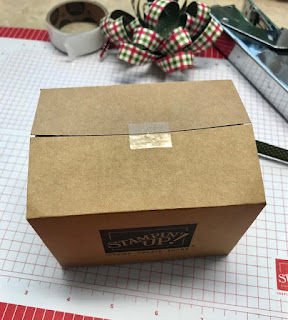
For my packaging I am using the Mini Stampin' Up! boxes that are currently on clearance while supplies last. These are a great little size - you get 8 boxes - 4" x 3" x 2 5/8" when folded together. #149492 - $2.00 a package clearance. My tip is to take your bone folder and made sure all the score lines are creased well before putting them together.
Next you'll want to fold up your box, and I sealed with a piece of tape to hold on top (the bottom can still be opened).

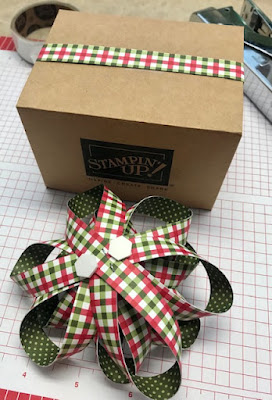
I then decided to use a 1/2" x 12" strip of the DSP to cover the tape and seam. This does not quite meet on the bottom of the box - so you can piece in a piece of the strips you cut up earlier. Add a couple dimensionals to the bottom of your bow -
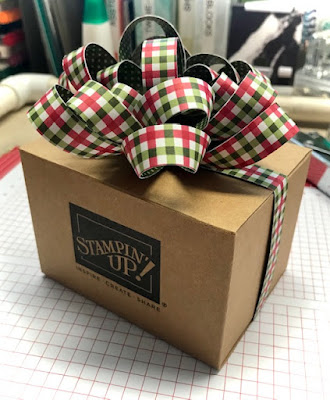
And attach to your little box on top. If I was gifting this with Stampin' Up! goodies inside - I would be sure to leave it just like this.
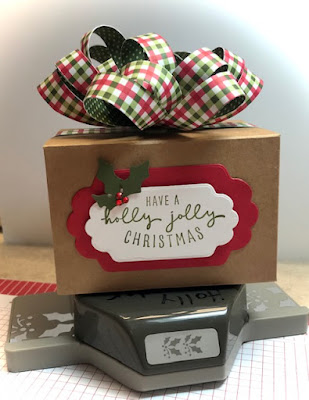
Or, if you'd just like to use it as a gift box - that logo is easy to cover - how cute is this a sentiment a couple dies and some holly!
I hope you were inspired by this - and be sure to order the boxes and the punch (on the last chance list) before they are GONE!
~*~*~*~*~
Now click on through to the rest of those hopping with me this month to see all of their wonderful creations and inspirations! ~Maureen

To order any of Stampin' Up's products you can go directly to my online store - www.stampingwithmaureen.stampinup.net  and click on SHOP NOW.  Please use the Hostess Code TC6V9JKH to get full benefits from me -
~*~*~*~*~ 
  *NOTE: If your personal order is not part of a current party and you are ordering over $150 in merchandise - please do not use this code; as your order without the code will qualify you to earn a minimum of 10% in hostess benefits.   

 ~*~*~*~*~

If you don't currently have a demonstrator, and would like a catalog or to learn more about Stampin' Up! and our products, please email me at crazystampinglady@gmail.com

Sunday, December 12, 2021

Share It Sunday!! - Free tutorial!

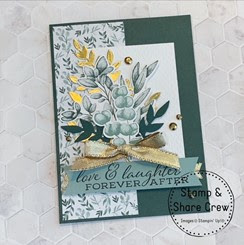
It's time to share another great tutorial - I've been focusing on the holidays - but life still goes on, so sharing a card that would be perfect for a December anniversary with it's rich greens and gold. We can't forget all our other special occasions -

~*~*~*~*~

Click HERE to find and print your tutorial sheet.

Forever Fern

All images © 1990-2021 Stampin’ Up!®

Supplies:

·       Stamp Sets: Forever Fern Cling Stamp Set (152559)

·       Card Stock and Paper: Soft Succulent Card Stock or (CS) (155776); Evening Evergreen Card Stock (155574); Basic White Card Stock (159276); Fold Foil Sheets (132622); Ever Eden 12” x12” Specialty Designer Series Paper (DSP) (159996)

·       Stamp Pads: Evening Evergreen Classic Stampin’ Pad (155576); Soft Succulent Evergreen Classic Stampin’ Pad (155778); Early Expresso Evergreen Classic Stampin’ Pad (147114)

·       Tools: Forever Flourishing dies (152714); Tailored Tag Punch (145667) Tasteful Textile 3D Embossing Folder (152718)

·       Miscellaneous: Gold 3/8” (1CM) Shimmer Ribbon (156470); Gilded Gems (152478); Stampin’ Dimensionals (104430); Stampin’ Seal Adhesive (152813); Mini Glue Dots (103683)

Measurements:

 Evening Evergreen (card base): 8 1/2” x 5 1/2”, scraps to die cut

·       Basic White: 3” x 4 1/4”, scraps to stamp and die cut

·       Soft Succulent3: 1” x 4”

·       DSP: White and green leaves pattern 5 1/4” x 2”

·       Gold Foil: scraps to die cut

·       Ribbon: 12”

Instructions:


1.    Fold the card base in half using a bone folder to have a crisp fold

2.    Glue the DSP onto the card front using Stampin’ Seal

3.    Emboss the Basic White Cardstock using the tasteful textile 3D embossing folder and glue this piece to the card front

4.    Stamp the leaves in Soft Succulent and Evening Evergreen ink onto the scraps of Basic White CS

5.    Due cut the stamped images and the leaves in Evening Evergreen and the Gold Foil Sheets using the Forever Flourishing dies

6.    Glue the leaves onto your card front as shown in the card picture

7.    Stamp the sentiment with Early Espresso Ink pad onto the Soft Succulent Strip and cut out the banner ends using the Tailored Tag Punch

8.    Glue a piece of Gold Shimmer Ribbon behind the sentiment and cut the ends with your scissors

9.    Glue the Banner/Sentiment to the card front using Stampin’ Dimensionals

10. Make a Bow with the Gold Shimmer Ribbon and glue to the card front using Mini Glue Dots

11. Add a few Gilded Gems to finish off your card. 

~*~*~*~*~

To order any of Stampin' Up's products you can go directly to my online store - www.stampingwithmaureen.stampinup.net  and click on SHOP NOW.  Please use the Hostess Code TC6V9JKH to get full benefits from me -

 ~*~*~*~*~ 

  *NOTE: If your personal order is not part of a current party and you are ordering over $150 in merchandise - please do not use this code; as your order without the code will qualify you to earn a minimum of 10% in hostess benefits.   

 ~*~*~*~*~

If you don't currently have a demonstrator, and would like a catalog or to learn more about Stampin' Up! and our products, please email me at crazystampinglady@gmail.com

Saturday, December 11, 2021

November Paper Pumpkin - Alternative Project #4

 
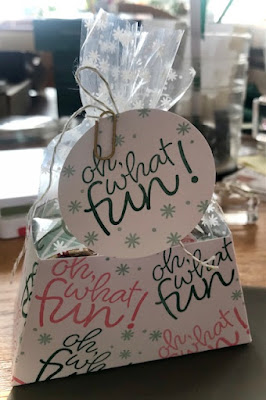
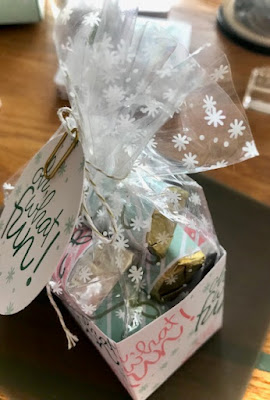
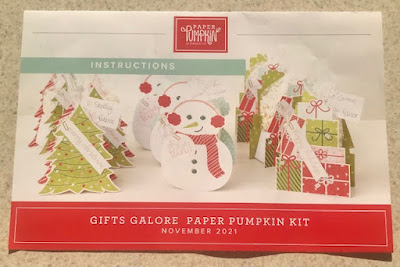
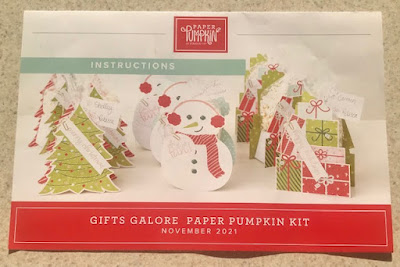
So my Paper Pumpkin class for the November kit is over and I can continue to share what we did as our alternatives - here is the fourth and final project we did for this kit - a cute little treat holder.
Tips
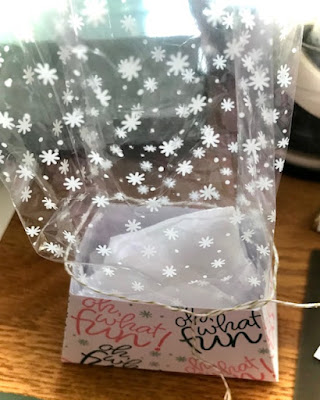
We started by stamping all over the little treat box portion while flat - "Oh, what fun!" with Shaded Spruce and Flirty Flamingo; and snowflakes with Pool Party.  Then adhered it together with Tear and Tape and placed it into one of the treat bags.  I cut about 1 1/4" off the top of the bag to make it easier for me to reach in and place the treats.    Next I took 1/3 of the white tissue that was in the kit and crumpled it up and put in the bottom of the little treat box - so my candies stood higher.  HINT: save everything from your kit that is practical - I always keep the tissue and use it in various ways.
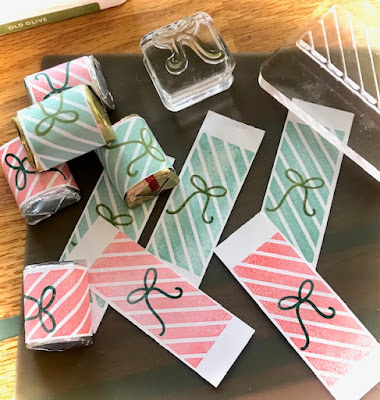
Then we stamped the striped gift image onto strips of 1" x 3" pieces of copy paper using Pool Party and Flirty Flamingo inks; and added bows with Old Olive and Shaded Spruce inks.  Then putting a glue dot on the back side on each end of the strip, wrapped them around Hershey's nuggets to fill the bag.
Finally we stamped the "Oh, what fun!" onto one of the round tags.  Tied the bag shut with a piece of the green twine; and hung the tag on with one of the little clips.
Voila - all done.  Would make an adorable little place setting treat - or add a gift card for a nice little gift! 
~*~*~*~*~

To order any of Stampin' Up's products you can go directly to my online store -www.stampingwithmaureen.stampinup.net and click on SHOP NOW.  Please use the Hostess Code below to get full benefits from me -
TC6V9JKH

*NOTE: If your personal order is not part of a current party and you are ordering over $150 in merchandise - please do not use this code; as your order without the code will qualify you to earn a minimum of 10% in hostess benefits.   

 ~*~*~*~*~

If you don't currently have a demonstrator, and would like a catalog or to learn more about Stampin' Up! and our products, please email me at crazystampinglady@gmail.com
Stop back soon for some more creative fun and inspiration.     ~Maureen

Friday, December 10, 2021

November Paper Pumpkin - Alternative Project #3

 
So my Paper Pumpkin class for the November kit is over and I can continue to share what we did as our alternatives - here is the third project we did -
Tips
For this card we used a notecard size envelope 3 5/8" x 5 1/8".  Basic White cut at 5" x 8 1/2" and scored along long side at 3 1/2" and 7" to form a gift card holder.  To do this you will fold on the score lines and attach the 1 1/2" section with sticky tape on each end and fold up into the card.   You're going to use this piece from the first project - 
 
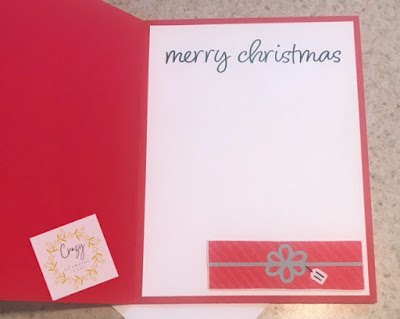
Adhere it to the front of your card and add gems to the centers of the bows.  Stamp your desired sentiment in Poppy Parade above the presents.  Here is the inside of card - 
We adhered a strip of Designer Series Paper from the Gingerbread & Pepper mint DSP - 1 1/4" x 4 3/4" to the front of the pocket we made and stamp your desired sentiment above it and on envelope.  All ready to tuck your gift card in for giving.

~*~*~*~*~

To order any of Stampin' Up's products you can go directly to my online store -www.stampingwithmaureen.stampinup.net and click on SHOP NOW.  Please use the Hostess Code below to get full benefits from me -
TC6V9JKH

*NOTE: If your personal order is not part of a current party and you are ordering over $150 in merchandise - please do not use this code; as your order without the code will qualify you to earn a minimum of 10% in hostess benefits.   

 ~*~*~*~*~

If you don't currently have a demonstrator, and would like a catalog or to learn more about Stampin' Up! and our products, please email me at crazystampinglady@gmail.com
Stop back soon for some more creative fun and inspiration.     ~Maureen

Thursday, December 9, 2021

November Paper Pumpkin - Alternative Project #2

 
So my Paper Pumpkin class for the November kit is over and I can continue to share what we did as our alternatives - here is the second project -
Tips
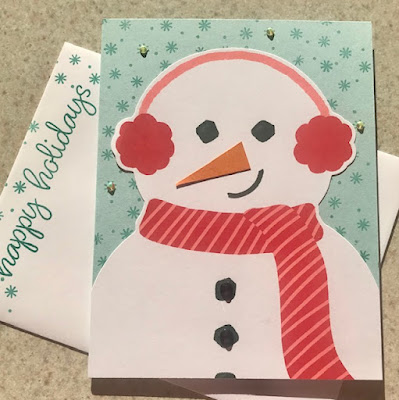
So for this card we used a Basic White envelope and a cardbase of Pool Party cardstock.  Snowflakes and sentiments from the kit were stamped with Bermuda Bay ink.  After stamping the snowflakes on the front of the card, we cut one of the snowmen down to fit on it - cutting the third piece of coal on him in half.  After attaching we needed to trip a little on each side of the card.  Then added a couple retired black gems to the coal pieces - you could color gems black and add them.
Next we adhered  triangle of Pumpkin Pie to turn his green nose orange, and added a few of our in-color gems for sparkle.
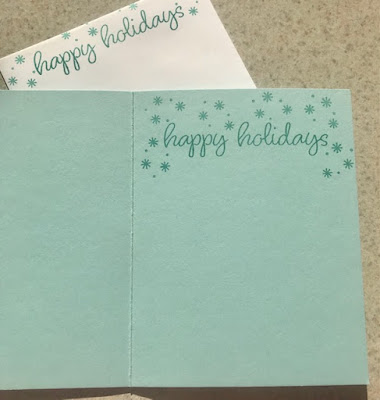
Then we stamped the inside of the card and the envelope to finish it off - ready to write in and send!

Let me know if you have any questions and stop back soon to see the next of my alternative projects for this kit.  Not a subscriber yet?  Follow this LINK to explore your options!

~*~*~*~*~

To order any of Stampin' Up's products you can go directly to my online store -www.stampingwithmaureen.stampinup.net and click on SHOP NOW.  Please use the Hostess Code below to get full benefits from me - TC6V9JKH*
*NOTE: If your personal order is not part of a current party and you are ordering over $150 in merchandise - please do not use this code; as your order without the code will qualify you to earn a minimum of 10% in hostess benefits.   

 ~*~*~*~*~

If you don't currently have a demonstrator, and would like a catalog or to learn more about Stampin' Up! and our products, please email me at crazystampinglady@gmail.com
Stop back soon for some more creative fun and inspiration.     ~Maureen

Tuesday, December 7, 2021

November Paper Pumpkin - Alternative Project #1


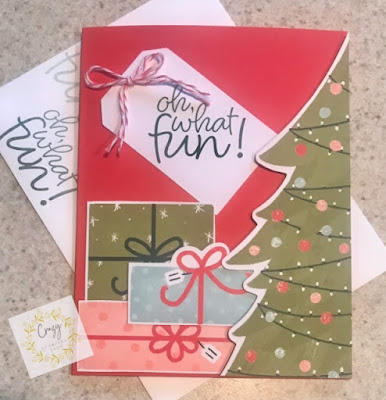
So my Paper Pumpkin class for the November kit is over and I can now share what we did as our alternatives - here is the first project - 

Tips to duplicate -

Start with a Poppy Parade A2 Base.

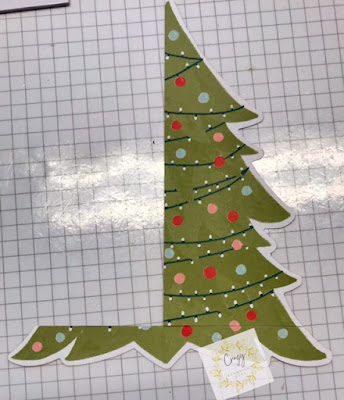
Take one of the Christmas Trees from the kit and cut off about 1/2" from the bottom, then cut the tree in half vertically.  This will be able to make two cards, one on the right and one on the left.

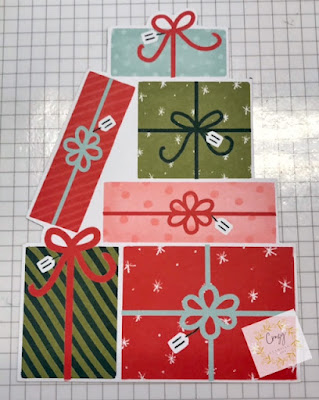
Next cut one of the presents' layers apart -

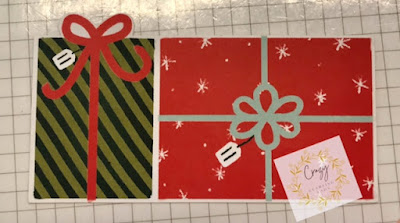
Just cut around each of the top four presents - creating four individual gifts.  Keep the two bottom presents together for another project later.
Stamp the sentiment onto one of the tags and layer onto card at angle as shown.  Tie a double bow with the pink twine and attach with a glue dot.  Place three of the presents you cut apart layering as shown.  Pop the Christmas tree half up on dimensionals and add Wink of Stella to the ornaments.  Finish the inside with a stamped piece of 4" x 5 1/4" Basic White and add the other single present to the inside. 
Let me know if you have any questions and stop back soon to see the next of my alternative projects for this kit.  Not a subscriber yet?  Follow this LINK to explore your options!

~*~*~*~*~

To order any of Stampin' Up's products you can go directly to my online store -www.stampingwithmaureen.stampinup.net and click on SHOP NOW.  Please use the Hostess Code below to get full benefits from me - TC6V9JKH*

*NOTE: If your personal order is not part of a current party and you are ordering over $150 in merchandise - please do not use this code; as your order without the code will qualify you to earn a minimum of 10% in hostess benefits.   

 ~*~*~*~*~

If you don't currently have a demonstrator, and would like a catalog or to learn more about Stampin' Up! and our products, please email me at crazystampinglady@gmail.com
Stop back soon for some more creative fun and inspiration.     ~Maureen