Thursday, October 18, 2018

Stampin' Friends October - Thanksgiving/Thankfulness/Grateful Hop!

It's a Thanksgiving/Grateful Hop - and I hope you like all the projects you see.  Be sure to go to the bottom and hop on through the other links after you've checked out my post.  I so love fall - leaves changing colors - hot coffee (I like this all year long) - sweater weather - it is my FAVORITE time of year.  This year it seemed to go directly from warm to cold here - but for now I'm loving it.  So this is a fun time for crafting for me.  My projects this month are great for this time of year - but I went a little unconventional in my color scheme.
No oranges for me - I went with Basic Gray, Slate Gray, Basic Black and Crumb Cake for an added layer of interest.  
My card is made with the Country Lane suite from the Holiday catalog page 43.  Hands down my favorite items in the entire Holiday Catalog - first thing on my list to be ordered.  The large layer in Slate Gray in back is embossed with the Tin Tile Dynamic Folder; and the stamped image is from the Country Home Set.  The background behind the milk can was made using the colors above (sans black) using the crumpled Saran Wrap technique on glossy cardstock and then stamped with Memento ink.
After stamping, the milk can and flowers were colored with Stampin' Write Markers, I added a bow of three strands of linen thread and glued on tiny bits of cotton with multipurpose glue to really make those cotton plant branches pop.
Then I added one of the sentiments and images from the same set to the inside of the card.  I love this for a fall Thankfulness card - so thankful for all my blessings!  Next my 3D project is a pumpkin in the same color scheme.
It starts with 9 - 6" x 3/4" strips of cardstock that I ran through the Big Shot with the Swirls and Curls from Pg 5 of the Holiday catalog.  I punched a hole on each end of each strip about a 1/4" in with a 1/8" punch.  Then threaded all holes on one end with our black glitter ribbon - tying a knot to hold in place.  The circle above was placed on the bottom with glue dots over the knot to help the pumpkin stand better.
Then I threaded the other end of the 6" ribbon through the other holes on the other ends of the strips; and gently squished to get a pumpkin shape; and tied another knot at the top to hold.  I then cut out some fun leaves with the Detailed Leaves Thinlits on Pg 45 of the Holiday catalog - gluing them to the top; then added a few color gems for some bling.
Here's a close-up of the top of the pumpkin so you can see the leaves and bling better.  I hope you liked my projects and got some inspiration.  I would love it if you left me a comment below.  Don't forget to click through on each name below to see even more wonderful Thankful Posts.  See you soon! ~Maureen 
 
Check out these Awesome Bloggers
1. Sue Vine - Australia  
2. Sandra Mastello - Australia  
3. Katja Ettig  
4. Kim Jolley  
5. Maureen Rauchfuss  
6. Jenny Hall  
7. Melissa Thomas  
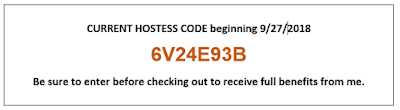
If you'd like to order any of the products shown; or look at all the products Stampin' Up! had to offer -  just go to my website: www.stampingwithmaureen.stampinup.net and click on SHOP NOW - be sure to use the current Hostess Code below~

Saturday, October 13, 2018

Easy Treat Boxes with a Template

Showing some easy treat boxes today - we made these in August and I had shared a quick picture - but have had some questions on measurements, etc.  So here goes. 
The boxes are made with 1/2 sheet of Very Vanilla cardstock cut 4.25"x10".  See template below - 
You are going to Score horizontally at 1" then turn score vertically at 1", 4.75", 5.75"and 9.5".  Placing the horizontal score toward the bottom you will cut up on each of the vertical score lines to the horizontal score line. I have darkened out a little triangle, as when you cut this way it is easier to fold the box together.  Note I also cut out the small rectangle at the right side bottom of the diagram. Then you will just score on all the score lines, place sticky strip as shown, and fold together.
You can see above after it is folded together you get a rectangle box with an open top.  We stamped, colored and fussy cut the flowers; and using the 1" strip we cut off the end at the beginning to make the length 10" - we stamped our sentiment.  Of course you can decorate as you choose.  Then pop in what ever goodie you like - and make someone's day.
Hope that helped a little bit.  These are quick and easy, and you can get two out of one sheet of cardstock - which is awesome.  
As always - You can order from me online at www.stampingwithmaureen.stampinup.net - click on SHOP NOW and be sure to use this hostess code -
Thanks for stopping by!  ~Maureen

Saturday, October 6, 2018

Halloween fun!

So - it's getting spooky around here...my grand-daughter Zamarah and I took some time this weekend to put up some of my Halloween decorations.   The cards are from friends, and the cute little bat candy jar is from my sister-in-law.
This has gotten me in the mood for some more Halloween card-making - so today I've been working on making up a bunch of cards for an upcoming vendor event on October 20. I am also doing a custom order for a friend - so lots of spooky card-making going on here.
Below is a close of up just one of the designs.  This is also the card we made at a recent Halloween stamp camp.  I really like how it turned out with that buffalo check background.

Just spooky enough to send out to all your little ghosts and goblins.  Just a reminder that I sell my cards for $4.00 each or 3/$10.00 plus postage if necessary.  I also do custom orders - so contact me if there is something special you are looking for. 

Don't forget that Sunday is the last day to order from the specials on the World Card Making Day Sale - check out more details HERE -
http://crazystampinglady.blogspot.com/2018/10/celebrate-world-card-making-day-all.html
You can order online at www.stampingwithmaureen.stampinup.net - click on SHOP NOW and be sure to use this hostess code - 
See you soon! ~Maureen

Monday, October 1, 2018

Celebrate World Card Making Day - all week long!

www.stampingwithmaureen.stampinup.net
Stampin' Up is celebrating World Card Making Day all week! Enjoy a discount on a bunch of products today through Sunday, October 7. You can order online at www.stampingwithmaureen.stampinup.net - click on SHOP NOW and be sure to use this hostess code - 
www.stampingwithmaureen.stampinup.net
Once you get in - just click on the World Card Making Day Sale on the upper left hand of the screen and shop away.  While you're there don't forget to check out the Clearance Rack and the Holiday Catalog for even more fun products!
The best part is these are the products you use every day for your card making - envelopes, kits and adhesives - plus a few wonderful stamp sets.  Don't miss out - check it out today!  ~Maureen

Thursday, September 27, 2018

In Color Club Cards

Today I'm sharing some fun cards all made with our current new 2018-2020 In-Colors.
Grapefruit Grove, Lovely Lipstick, Call Me Clover, Pineapple Punch and Blueberry Bushel
These colors are simply gorgeous -
Each month of June - October I have offered an In-Color club - each of those month Club members received a bundle of all the products from the Annual catalog in one color - with a new handmade card from me each month.  This was a bundle from a previous month.
I have so much fun making the cards and here is what I came up with for the month of September -
The rest of the colors -
And the inside of the card -
I think the club members have really enjoyed getting these packets - and I've enjoyed putting them together.  One month to go - but I think I'll be doing this again in June 2019 - so watch for that deal if you're interested!  See you all soon.  ~Maureen
If you'd like to order just go to my website: www.stampingwithmaureen.stampinup.net and click on SHOP NOW - be sure to use the hostess code below - 

Thursday, September 20, 2018

Stampin' Friends September Blog Hop - Halloween theme!

Halloween - are you kidding me - but in reality - I know it's right around the corner.  Welcome to the Stampin' Friends Blog Hop for September - check out my blog post below, and then be sure to hop through all the rest (links at the bottom) to see all the amazing HALLOWEEN projects and ideas.
~*~*~*~*~
So this month's theme fit perfectly with what I was doing for my technique clubs this month.  This first card though, was a sample for my recent new catalog open house - it uses the  Toil and Trouble DSP and Spooky Sweets Stamp Set - that little witch is just sooooo cute!
Since that card was such a hit, I decided to use the same DSP, along with our new shimmer paints for my clubs.  Here is the card we came up with for that.  The sentiment here is from the Cauldron Bubble set.  The cauldron and the black cat were cut out with the coordinating dies - Cauldron Framelit Dies.  But we fussy cut the cute little witches.  There is actually a die that will cut out one of the poses of witches on the DSP, but does not work with all - so we just fussy cut.
The cauldron is glued flat on the card, while the witch and the kitty are popped up on dimensionals.  You can see how they layer over the cauldron, side layer and sentiment.  Here's the inside of the card, along with the outside of the envelope - so fun for Halloween!
Below you can see the shimmer paint used 3 ways.  1) we used a sponge to sponge it all over the Blueberry Bliss layer.  Then 2) we added a bit of the paint to a folded baby wipe, and using it as a pad, stamped the stars around on the same layer.  Finally 3) using an aqua painter, we painted the champagne shimmer onto the green potion oozing out of the cauldron.  Hope you can see all the shimmer and dimension in this picture.
We also made the cute little treat holder below.  The original design came directly from Angie Juda Kennedy - her blog post can be reached by clicking here - https://mychicnscratch.com/2018/08/cauldron-bubble-halloween.html  I loved it, but it takes a large piece of DSPso you can only get two out of a sheet.  I wanted to be able to get more out of a sheet, so I adapted the pattern down to do a little treat holder that will hold three Hershey's nuggets.
Below is the pattern and measurements of the little box the way I made it.  You can now get 6 from each sheet.  When you are done cutting as below -  you assemble just as shown on the video in Angie's blog post.
 Next I cut three strips of coordinating DSP - 1"x3" each -
And using a glue dot on the each end of the wrong side of the DSP - I wrapped them around Hershey Nuggets.
 Adhering on the bottom with the glue dots!
So here are two of the little treat holders - each the same design just using different DSP -
And a side view so  you can see the three little nuggets tucked in there - you can get all three in perfectly if you stand them on their ends.  What an adorable little gift for friends, family, neighbors - or how about a RAK for your hair stylist, your mailman, the guy at the post office - the possibilities are endless.  With 6 out of each 12x12" sheet of DSP - one package of this paper goes a long way.
Hope you liked my projects and would love if you left a comment below.  Don't forget to click on each name in the list to see more wonderful Halloween blog posts!  See you soon ~Maureen

Check out these Awesome Bloggers
1. Kirsteen Gill  
2. Katja Ettig  
3. Sandra Mastello  
4. Sue Vine - Australia  
5. Jenny Hall  
6. Kim Jolley  
7. Stephanie Jandrow  
8. Melissa Thomas  
9. Maureen Rauchfuss  
10. Barbara Welch  
11. Anastasia Radloff  
12. Lori Mueller  
13. Sandra Roberts (UK)  
If you'd like to order just go to my website: www.stampingwithmaureen.stampinup.net and click on SHOP NOW  - be sure to use the hostess code below -

Wednesday, September 5, 2018

New Holiday catalog and Day 7 of our Alaskan Cruise!

So today is the day - the Holiday Catalog is LIVE and you can purchase!  Click on the catalog before and you can view the entire thing - and believe me -  you are gonna love it!
http://www.stampinup.net/esuite/home/stampingwithmaureen/catalogs
Oh Man, can't believe I'm sharing the last full day of our cruise - here we are at sea early morning headed down to Victoria, Canada.


Paul and I took a bus tour around the town, and it was amazing - the architecture just blew my mind - all of the history in those buildings.  But - I cannot find the pictures I took - and I took a ton.  They are hiding in my camera somewhere - argh!
After we got back on the ship - we headed down to SU!'s base camp one more time -
Took pictures of a bunch of the great share cards that were posted -
Spun the wheel for a prize - one more time!
Got a few more treats on this last day -
After all this SU! hosted a farewell get-together with more yummies - but again - I cannot find those pictures.  Double argh!  But back in our cabin we were once again welcomed with pillow gifts.  In that tube is a large scratch off map - where you can scratch off the areas you travel too - how cool is that.
And we got one of my very favorite new bundles in the Holiday catalog - this Dashing Deer set and framelits.  I LOVE IT!
 Thank you, thank you to Stampin' Up! for a memorable week - I love working for this awesome company.  This is my last month to earn the Greek Isles trip - so watch for a big HOORAY from me when that happens.  See you soon!  ~Maureen