Friday, December 10, 2021

November Paper Pumpkin - Alternative Project #3

 
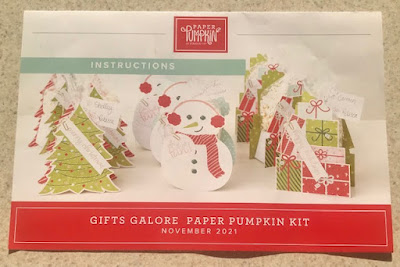
So my Paper Pumpkin class for the November kit is over and I can continue to share what we did as our alternatives - here is the third project we did -
Tips
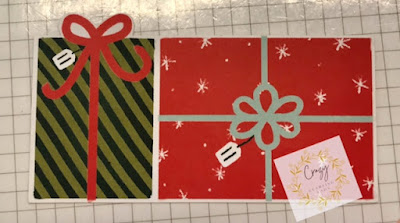
For this card we used a notecard size envelope 3 5/8" x 5 1/8".  Basic White cut at 5" x 8 1/2" and scored along long side at 3 1/2" and 7" to form a gift card holder.  To do this you will fold on the score lines and attach the 1 1/2" section with sticky tape on each end and fold up into the card.   You're going to use this piece from the first project - 
 
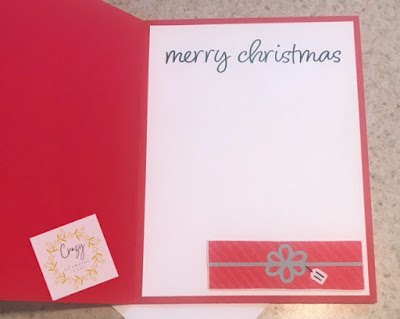
Adhere it to the front of your card and add gems to the centers of the bows.  Stamp your desired sentiment in Poppy Parade above the presents.  Here is the inside of card - 
We adhered a strip of Designer Series Paper from the Gingerbread & Pepper mint DSP - 1 1/4" x 4 3/4" to the front of the pocket we made and stamp your desired sentiment above it and on envelope.  All ready to tuck your gift card in for giving.

~*~*~*~*~

To order any of Stampin' Up's products you can go directly to my online store -www.stampingwithmaureen.stampinup.net and click on SHOP NOW.  Please use the Hostess Code below to get full benefits from me -
TC6V9JKH

*NOTE: If your personal order is not part of a current party and you are ordering over $150 in merchandise - please do not use this code; as your order without the code will qualify you to earn a minimum of 10% in hostess benefits.   

 ~*~*~*~*~

If you don't currently have a demonstrator, and would like a catalog or to learn more about Stampin' Up! and our products, please email me at crazystampinglady@gmail.com
Stop back soon for some more creative fun and inspiration.     ~Maureen

Thursday, December 9, 2021

November Paper Pumpkin - Alternative Project #2

 
So my Paper Pumpkin class for the November kit is over and I can continue to share what we did as our alternatives - here is the second project -
Tips
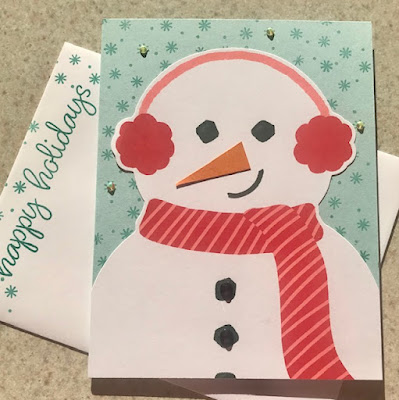
So for this card we used a Basic White envelope and a cardbase of Pool Party cardstock.  Snowflakes and sentiments from the kit were stamped with Bermuda Bay ink.  After stamping the snowflakes on the front of the card, we cut one of the snowmen down to fit on it - cutting the third piece of coal on him in half.  After attaching we needed to trip a little on each side of the card.  Then added a couple retired black gems to the coal pieces - you could color gems black and add them.
Next we adhered  triangle of Pumpkin Pie to turn his green nose orange, and added a few of our in-color gems for sparkle.
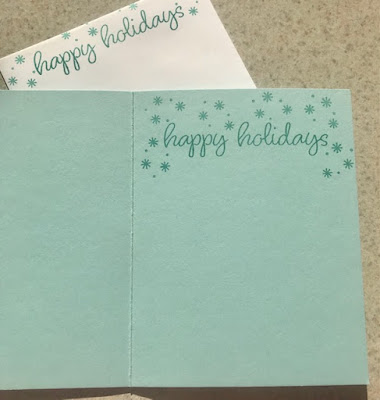
Then we stamped the inside of the card and the envelope to finish it off - ready to write in and send!

Let me know if you have any questions and stop back soon to see the next of my alternative projects for this kit.  Not a subscriber yet?  Follow this LINK to explore your options!

~*~*~*~*~

To order any of Stampin' Up's products you can go directly to my online store -www.stampingwithmaureen.stampinup.net and click on SHOP NOW.  Please use the Hostess Code below to get full benefits from me - TC6V9JKH*
*NOTE: If your personal order is not part of a current party and you are ordering over $150 in merchandise - please do not use this code; as your order without the code will qualify you to earn a minimum of 10% in hostess benefits.   

 ~*~*~*~*~

If you don't currently have a demonstrator, and would like a catalog or to learn more about Stampin' Up! and our products, please email me at crazystampinglady@gmail.com
Stop back soon for some more creative fun and inspiration.     ~Maureen

Tuesday, December 7, 2021

November Paper Pumpkin - Alternative Project #1


So my Paper Pumpkin class for the November kit is over and I can now share what we did as our alternatives - here is the first project - 

Tips to duplicate -

Start with a Poppy Parade A2 Base.

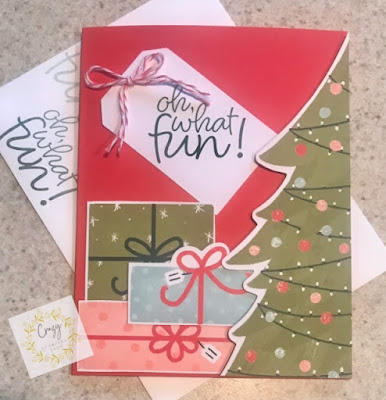
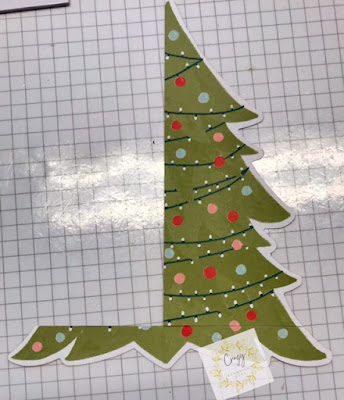
Take one of the Christmas Trees from the kit and cut off about 1/2" from the bottom, then cut the tree in half vertically.  This will be able to make two cards, one on the right and one on the left.

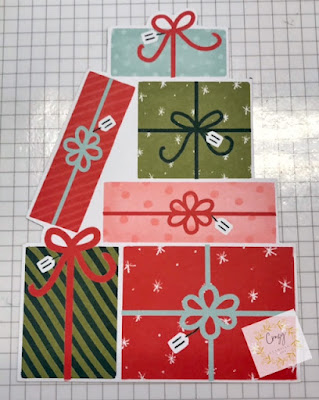
Next cut one of the presents' layers apart -

Just cut around each of the top four presents - creating four individual gifts.  Keep the two bottom presents together for another project later.
Stamp the sentiment onto one of the tags and layer onto card at angle as shown.  Tie a double bow with the pink twine and attach with a glue dot.  Place three of the presents you cut apart layering as shown.  Pop the Christmas tree half up on dimensionals and add Wink of Stella to the ornaments.  Finish the inside with a stamped piece of 4" x 5 1/4" Basic White and add the other single present to the inside. 
Let me know if you have any questions and stop back soon to see the next of my alternative projects for this kit.  Not a subscriber yet?  Follow this LINK to explore your options!

~*~*~*~*~

To order any of Stampin' Up's products you can go directly to my online store -www.stampingwithmaureen.stampinup.net and click on SHOP NOW.  Please use the Hostess Code below to get full benefits from me - TC6V9JKH*

*NOTE: If your personal order is not part of a current party and you are ordering over $150 in merchandise - please do not use this code; as your order without the code will qualify you to earn a minimum of 10% in hostess benefits.   

 ~*~*~*~*~

If you don't currently have a demonstrator, and would like a catalog or to learn more about Stampin' Up! and our products, please email me at crazystampinglady@gmail.com
Stop back soon for some more creative fun and inspiration.     ~Maureen
Sunday, December 5, 2021

Share It Sunday!! Merriest Moments - Free tutorial!

 
It's time to share another great tutorial - this is such a great Christmas card - and I hope you like it as much as I do -

~*~*~*~*~

Click HERE to find and print your tutorial sheet.

Merriest Moments

All images © 1990-2021 Stampin’ Up!®

Supplies:

·       Stamp Sets: Merriest Moments (156353)

·       Card Stock and Paper: Basic White (159276); In Good Taste DSP (152494); Blushing Bride (131198)

·       Stamp Pads: Flirty Flamingo (147052); Evening Evergreen (155576); Garden Green (147089)

·       Tools: Merriest Frames Hybrid Embossing Folder (56385); Scalloped Contour Dies (155560), Bone Folder (102300), Stampin’ Cut & Emboss Machine (149653); Multipurpose Liquid Glue (110755), Paper Snips (103579)

·       Miscellaneous: Stampin’ Dimensionals (104430); Stampin Blends Combo packs in Soft Succulent (155521); Granny Apple Green (154885); Old Olive (154892); Blending Brushes (153611); 

Measurements:

·       Basic White: 8 ½ X 5 ½ scored at 4 ¼ and burnished with the Bone Folder, remainder of sheet for stamping and diecutting

·       Blushing Bride: 4.25 X 5.5

·       In Good Taste Woodgrain DSP 5 ½  X 4 ¼

INInstructions:

1.    Die cut Merriest frames background in Basic White; Die cut Merriest Frames greenery overlay and shade leaves in various shades of green with blending brushes; Die cut Merriest Frames center square and stamp with Merriest Moments sentiment in Evening Evergreen

2.    Stamp poinsettias from Merriest Moments stamp set with Flirty Flamingo ink on Blushing Bride paper. Stamp poinsettia center with Garden Green.  Die cut Poinsettias.

3.    Adhere DSP to card front with glue; Adhere colored greenery to white background and adhere to DSP. Using stamping dimensional, adhere center message.  Using stamping dimensionals adhere poinsettias above and below the frame corners.  Use two dimensionals for some flowers to add more dimension.

 ~*~*~*~*~

To order any of Stampin' Up's products you can go directly to my online store - www.stampingwithmaureen.stampinup.net  and click on SHOP NOW.  Please use the Hostess Code TC6V9JKH to get full benefits from me -

 ~*~*~*~*~ 

  *NOTE: If your personal order is not part of a current party and you are ordering over $150 in merchandise - please do not use this code; as your order without the code will qualify you to earn a minimum of 10% in hostess benefits.   

 ~*~*~*~*~

If you don't currently have a demonstrator, and would like a catalog or to learn more about Stampin' Up! and our products, please email me at crazystampinglady@gmail.com

Sunday, November 28, 2021

Share It Sunday!! Pretty Pumpkins Stamp Set Giving Thanks - Free tutorial!


 It's Sunday and time for another great tutorial to share with you.  Just wanted to share one more Pretty Pumpkins card - especially at this time of Thankfulness - hope you all had a wonderful Thanksgiving.  This would be a perfect card to send to whomever hostessed your gathering.  So today I'm sharing this FREE tutorial - love the gilding on it. 

~*~*~*~*~

Click HERE to find and print your tutorial sheet!

Pretty Pumpkins

All images © 1990-2021 Stampin’ Up!®

Supplies:

·       Stamp Sets: Pretty Pumpkins (156472)

·       Card Stock and Paper: Basic Black (121045);

Soft Succulent (155776); Old Olive (100702);                              

Basic White (159276)

·       Stamp Pads: Memento Ink (132708);

Soft Succulent (155778)

·       Tools:  Painted Texture 3D (154317); Paper Snips Scissors (103579)

·       Miscellaneous: Soft Succulent Stampin’ Blends (155521); Old Olive Stampin’ Blends (154892): Simply Elegant Trim (155766); Gilded Leafing (154560); Multipurpose Liquid Glue (110755); Stampin’ Dimensionals (104430); Sponge Daubers (133773); Mini Glue Dots (103683)

Measurements:

·       Basic Black: 8 1/2” x 5 1/2”, 2 1/4” X 3 1/4”

·       Soft Succulent: 5 1/4” x 4”

·       Old Olive: 2” x 3”

·       Basic White: 2 1/2 ” x 3 1/2” for stamping Pumpkins and a scrap for Sentiment

·       Trim: 3”

 Instructions:

 1.    Score and fold at 4 1/4” on the long side.

2.    Emboss the Soft Succulent piece with the Painted Texture 3D folder.

3.    With a dauber, daub lightly it into a small pool of Multipurpose Liquid Glue then tap onto the Soft Succulent (CS). Take Gilded Leafing and tap onto the tacky Multipurpose Liquid Glue. And remove excess with your fingers. Adhere to the Basic Black card base.

4.    Stamp the pumpkin images using Memento. Colour the Pumpkins with the Soft Succulent Blends and the leaves with the Old Olive Blends. Fussy cut using your Paper Snips Scissors.

5.    Stamp the sentiment in Soft Succulent onto a scrap piece of Basic White and fussy cut out.

6.    Adhere the Old Olive piece onto the small Basic Black piece with Stampin’ Dimensionals. Then place onto card base using Multipurpose liquid glue.

7.  Place Stampin’ Dimensionals onto the backside of Pumpkins and Sentiment and adhere onto the Old Olive piece.

8.    Tie a bow with the Simply Elegant Trim and add to the Pumpkin with a Mini Glue Dot to finish off your card.

 ~*~*~*~*~

To order any of Stampin' Up's products you can go directly to my online store - www.stampingwithmaureen.stampinup.net  and click on SHOP NOW.  Please use the Hostess Code 9MVQD9GQ to get full benefits from me -

~*~*~*~*~ 
  *NOTE: If your personal order is not part of a current party and you are ordering over $150 in merchandise - please do not use this code; as your order without the code will qualify you to earn a minimum of 10% in hostess benefits.   

 ~*~*~*~*~

If you don't currently have a demonstrator, and would like a catalog or to learn more about Stampin' Up! and our products, please email me at crazystampinglady@gmail.com

Friday, November 26, 2021

SF 2021 November - Celebrate the Season Blog Hop


Be sure to hop through all the blogs on the list near the bottom for tons of wonderful inspiration as we Celebrate the Season!
 ~*~*~*~*~

If you've come from Jean's post - her projects are awesome! So, if you did not, be sure you swing back to see what she did - you won't want to miss it.  

This month is all about Celebrating the Season.   Can you believe we are only a month out from Christmas?  I still have so many sets I haven't used and the July - Dec 2021 catalog is almost gone.  So I could not let that happen without pulling out my Christmas to Remember Stamp set and Painted Christmas DSP -

These products are simply beautiful - so I went with a card - and a Christmas list notebook.  So, believe it or not I started with this little Dracula notebook I picked up after Halloween for only .25 - how great is that.  I loved the size of it, and that it had a pretty sturdy cover - so got it not knowing what I'd do with it.  A bargain too good to pass up :)
I decided I'd alter it - and loved that it had black along the spiral - so I was just able to cut two pieces of basic black to cover the front and back easily.

Next I decided to add Real Red layers to coordinate with the DSP I was using.  I cut out one of the labels using a die from the Seasonal Labels Dies - right out of the center of the Real Red layer - as I knew it was going to be covered up.
Then used the DSP - that layer - a sentiment and a die cut layer of Vanilla - as well as holly leaves and berries to finish it off - 
Here's the first page with my hubbies Christmas wish list (just in case any of you want to get him a gift lol).  This fits right in the front pocket of my purse - so that is great.

Then I made this front fold back card to match - scoring the front at 1 1/4" and folding it back on itself, then layering the Real Read, DSP, Label, Holly and berries to match. I added some Wink of Stella to the berries for a little shimmer.
Hope you like my projects and find a little creative inspiration from some great Stampin' Up! products.

 ~*~*~*~*~

Once again, thank you for stopping by my blog.   Maybe you got some inspiration for creating something wonderful of your own.  I would love it if you would leave me a comment below and stop back soon.  Don't forget to click through on each name below to see even more awesome ideas.

See you soon with more creative inspiration!  

November 2021 SF Hopperscheck them all out by clicking on their links for some more great ideas - and please leave comments if you can, to show appreciation for their work :)
~*~*~*~*~

To order any of Stampin' Up's products you can go directly to my online store -www.stampingwithmaureen.stampinup.net and click on SHOP NOW.  Please use the Hostess Code below to get full benefits from me - 9MVQD9GQ*

*NOTE: If your personal order is not part of a current party and you are ordering over $150 in merchandise - please do not use this code; as your order without the code will qualify you to earn a minimum of 10% in hostess benefits.   

 ~*~*~*~*~

If you don't currently have a demonstrator, and would like a catalog or to learn more about Stampin' Up! and our products, please email me at crazystampinglady@gmail.com
Stop back soon for some more creative fun and inspiration.     ~Maureen
Sunday, November 21, 2021

Share It Sunday!! Words of Cheer Stamp Set - Free tutorial!


 It's Sunday and time for another great tutorial to share with you today!  
Time to finish up those holiday cards, as the time is almost here :)  That is what inspired this beautiful card choice.  Today I'm sharing this FREE tutorial - so lovely - hope you like it too!

~*~*~*~*~

Click HERE to find and print your tutorial sheet!
 

Words of Cheer 

All images © 1990-2021 Stampin’ Up!®


Supplies:


  • Stamp Sets: Words of Cheer (156357) 

  • Card Stock and Paper: Basic White (159276); Soft Succulent (155776); Polished Pink (155710); Evening Evergreen (155574)

  • Stamp Pads: Polished Pink (155715); Smokey Slate (147113)

  • Tools: Christmas Cheer Dies (156388); Scalloped Contour Dies (155560), Bone Folder (102300), Stampin’ Cut & Emboss Machine (149653); Multipurpose Liquid Glue (110755), Paper Snips (103579)

  • Miscellaneous: In Color Jewels (155571); Stampin’ Dimensionals (104430); Stampin Blends Combo packs in Soft Succulent (155521); Granny Apple Green (154885); Real Red (154899);Old Olive (154892); Blending Brushes (153611);Open Weave Ribbon in Soft Succulent (155780)


Measurements:


  • Basic White: 5” X 7” scored at 3 ½” and burnished with the Bone Folder, remainder of sheet for stamping and diecutting

  • Soft Succulent: 5 ½” X 4”

  • Evening Evergreen 3” X 3”

  • Polished Pink 5” X 5”

  • Ribbon: 10 inches


Instructions:


  1. Die cut 4 ½ inch scalloped edge frame from Scalloped Contour Dies, From the Christmas Cheer dies, die cut branches in Evening Evergreen, die cut holly leaves in Basic White, die cut small ball branches and color in light Granny Apple Green, die cut the small flowers in Basic White and shade with a Blending Brush using Polished Pink. 

  2. Die cut “happy” background from Christmas Cheer dies in Basic White, color stems in Soft Succulent, Granny Apple Green, and light Olive

  3. Die cut “happy” from Christmas Cheer dies 3 times in Polished Pink, glue three layers together and adhere to the background happy die cut in Basic White

  4. Stamp Floral arrangement from Words of Cheer using Smokey Slate; die cut image; using a blending brush color in flowers with Polished Pink; color stems with soft succulent light and dark, light old olive, light Granny Apple Green; color ball sprays with light real red

  5. Stamp “HOLIDAYS” on Basic White using Polished Pink and cut 

  6. Adhere scalloped contour panel using Stampin’ Dimensionals; fold ribbon and cross and adhere to the soft succulent panel using Stampin’ Dimensionals, adhere main floral image over the ribbon using Stampin’ Dimensionals, Glue white holly, Evening Evergreen branches, and light Granny Apple Green branches around the floral image. Adhere the die cut small flower on top of the smallest stamped flower for extra dimension. Adhere In Color Jewels in Evening Evergreen to the center of the flowers

  7. Adhere “happy” stack over the image using Stampin’ Dimensionals

  8. Adhere HOLIDAYS using Stampin’ Dimensionals

  9. Trim ribbon to your liking


~*~*~*~*~

To order any of Stampin' Up's products you can go directly to my online store - www.stampingwithmaureen.stampinup.net  and click on SHOP NOW.  Please use the Hostess Code 9MVQD9GQ to get full benefits from me -

~*~*~*~*~ 
  *NOTE: If your personal order is not part of a current party and you are ordering over $150 in merchandise - please do not use this code; as your order without the code will qualify you to earn a minimum of 10% in hostess benefits.   

 ~*~*~*~*~

If you don't currently have a demonstrator, and would like a catalog or to learn more about Stampin' Up! and our products, please email me at crazystampinglady@gmail.com