Wednesday, January 19, 2022

Paper Crafting Blog Hop January 2022 - Sale-a-bration and Birthdays!

 
Welcome to our Paper Crafting Blog Hop for January 2022 featuring talented Independent Stampin’ Up! Demonstrators. Fellow demonstrators from all over the globe including the USA, United Kingdom and Australia are participating. We have a wide array of fun projects and design styles to share with you this month - all spotlighting
projects that are Sale-a-bration/Birthdays!

~*~*~*~*~

I love the way our image stamp sets and our Designer series paper and our sentiment stamps all work together to make beautiful creations. For my card I used two Sale-a-bration products - Sunshine & Rainbows DSP and the Driving By stamp set. But I wanted to also go with the theme of birthdays, so I pulled my sentiments for this card from Best Year in our annual catalog - and they work great together!!
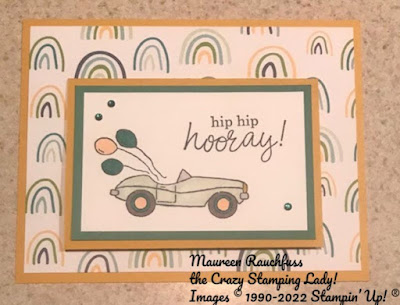
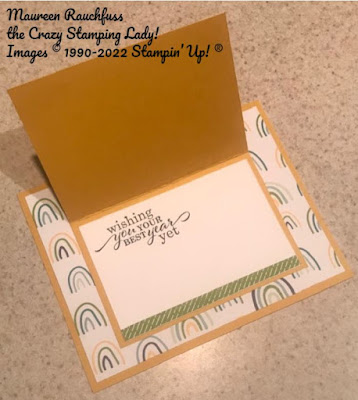
My card is a card on a card. This time of year I have tons of birthdays coming up - so quick and easy is the name of the game. I posted a video of a similar card and how I made it on my Facebook Live 1/7/22 - CLICK HERE.

The measurements for this one are a bit different - base is Crushed Curry 4 1/4" x 5 1/2"; DSP layer is 4" x 5 1/4". The for the little card you'll take a base of 4" x 5 1/2" and score it on the short side at 2 3/4" fold and attach to the base. Inside is Basic White 2 1/2" x 3 3/4" and a scrap of DSP. Outside is a 2 1/2" x 3 3/4" piece of Bermuda Bay; and a 2 1/4" x 3 1/2" piece of Basic White which is stamped and colored with blends. I also colored some rhinestone gems with a Bermuda Bay Blend and added as bling. I love the look and made several of the same card in no time flat - hope you liked it too!

~*~*~*~*~
Now click on through to the rest of those hopping with me this month to see all of their wonderful creations and inspirations! ~Maureen
To order any of Stampin' Up's products you can go directly to my online store - www.stampingwithmaureen.stampinup.net  and click on SHOP NOW.  Please use the Hostess Code 2FKZNR64 to get full benefits from me -
~*~*~*~*~ 
  *NOTE: If your personal order is not part of a current party and you are ordering over $150 in merchandise - please do not use this code; as your order without the code will qualify you to earn a minimum of 10% in hostess benefits.   

 ~*~*~*~*~

If you don't currently have a demonstrator, and would like a catalog or to learn more about Stampin' Up! and our products, please email me at crazystampinglady@gmail.com

Sunday, January 16, 2022

January Customer Creative Challenge - Use that Designer Series Paper!

 
Hey all - it's time to get your creative thinking caps on.  
Now through January 31, 2022 you have a chance to enter your best card designs that include at least two different pieces of Stampin' Up! Designer Series paper, for a chance to win a package of our new Brushed Brass Butterflies from page 15 of the January - June mini catalog.* 
You can enter your pictures in the comment section of the Challenge Post on my Crazy Stamping Lady! Facebook page - or you can email me a photo of your card to crazystampinglady@gmail.com

All entries must be received by midnight January 31, 2022 AZ time (USA) to qualify and I will choose a winner the next day from all entries received.
Have fun! Be creative! Good luck!
*You are welcome to submit multiple entries but each one must be submitted individually.
Prize will be mailed out to you shortly after drawing.  You will need to provide me your mailing address if I do not already have it.

 ~*~*~*~*~

To order any of Stampin' Up's products you can go directly to my online store - www.stampingwithmaureen.stampinup.net  and click on SHOP NOW.  Please use the Hostess Code 2FKZNR64 through Jan. 31, 2022 to get full benefits from me -

~*~*~*~*~ 

  *NOTE: If your personal order is not part of a current party and you are ordering over $150 in merchandise - please do not use this code; as your order without the code will qualify you to earn a minimum of 10% in hostess benefits.   

 ~*~*~*~*~

If you don't currently have a demonstrator, and would like a catalog or to learn more about Stampin' Up! and our products, please email me at crazystampinglady@gmail.com


Share It Sunday!! Free Tutorial - Flowing Flowers

It's time to share another great tutorial - I just love this fresh and spring-like card - in the midst of January cold it offers a glimpse at Spring - Enjoy!!

~*~*~*~*~

Click HERE to find and print your tutorial sheet.

 Flowing Flowers

All images © 1990-2022 Stampin’ Up!®

Supplies:


·       Stamp Sets: Flowing Flowers (157880)

·       Card Stock and Paper: Basic White Cardstock (CS) (159276); Polished Pink CS (155710); In Color 2021-2023 6” x 6” Designer Series Paper (DSP) (155641)

·       Stamp Pads: Balmy Blue Classic Stampin’ Pad (147105); Soft Succulent Classic Stampin’ Pad (155778); Polished Pink Classic Stampin’ Pad (155712)

·       Tools:  Stitched Rectangle Dies (151820); Stampin’ Cut & Emboss Machine (149653); Paper Trimmer (152392); Bone Folder (102300); Take Your Pick (144107); Silicone Craft Sheet (127853); Blending Brushes (153611); Clear Block E (118484); Simply Shammy (147042)

·       Miscellaneous: Genial Gems (155500); Stampin’ Dimensionals (104430); Multipurpose Liquid Glue (110755)


Measurements:


·       Basic White: 8 1/2” x 5 ½”; 5 3/8” x 4 1/8”; 4 ½” x 3”

·       Polished Pink: 3 5/8” x 2 1/4

·       In Color 2021-2023 DSP: 5 1/4” x 5/8”; 5 ¼” X 1 7/8


Instructions:


1.    Score and fold the 8 ½” x 5 ½” Basic White CS at 4 ¼” on the long side to create the card base. Burnish the fold line with the bone folder to create a crisp fold.

2.    Use the Blending Brushes to apply Balmy Blue ink and Soft Succulent ink to the 5 3/8” x 4 1/8” Basic White CS. Start at the top with Balmy Blue and blend downward to the Soft Succulent. Overlap the two colors about 1 ½” from the bottom. Adhere to the card base with Multipurpose Liquid Glue.

3.    Arrange and adhere the DSP strips to the card front.

4.    Stamp the large flower from the Flowing Flowers with Polished Pink ink onto the 4 ½” x 3” Basic White CS and die cut with 3 ¾” x 2 3/8” Stitched Rectangle Die. Adhere this to the Polished Pink CS with Multipurpose Liquid Glue and embellish with the Genial Gems. Attach this piece to the card front with Stampin’ Dimensionals.

~*~*~*~*~

To order any of Stampin' Up's products you can go directly to my online store - www.stampingwithmaureen.stampinup.net  and click on SHOP NOW.  Please use the Hostess Code 2FKZNR64 through Jan. 31, 2022 to get full benefits from me -

~*~*~*~*~ 

  *NOTE: If your personal order is not part of a current party and you are ordering over $150 in merchandise - please do not use this code; as your order without the code will qualify you to earn a minimum of 10% in hostess benefits.   

 ~*~*~*~*~

If you don't currently have a demonstrator, and would like a catalog or to learn more about Stampin' Up! and our products, please email me at crazystampinglady@gmail.com


Sunday, January 9, 2022

Share It Sunday!! Free Tutorial - Sweet Conversations


It's time to share another great tutorial - a SNEAK PEEK of new products from the upcoming catalog and SAB  that being Jan. 4, 2022.  Enjoy!!

Happy 2022! Welcome to a new year of creativity!!

~*~*~*~*~

Click HERE to find and print your tutorial sheet.

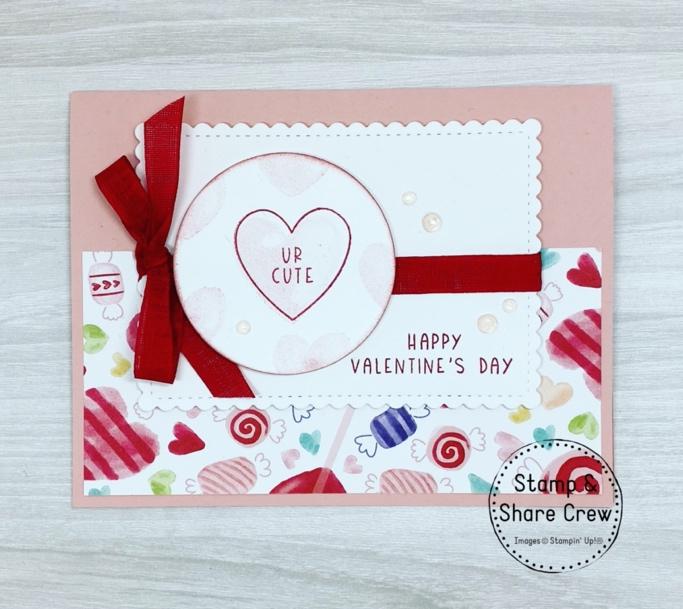
Sweet Conversations Valentine’s Card

All images © 1990-2021 Stampin’ Up!

Supplies:

  • Stamp Set: Sweet Conversations (157618)

  • Card Stock and Paper: Blushing Bride Cardstock (131198); Basic White

  • (159276); Sweet Talk Designer Series Paper (157616)

  • Stamp Pads: Blushing Bride (147100); Real Red (147084)

  • Tools: Stitched So Sweetly Dies (151690); Stampin’ Cut & Emboss Machine

  • (149653), Layering Circle Dies (151770) or a 2 ¼” circle punch

  • Miscellaneous: Stampin’ Dimensionals (104430); Stampin’ Seal Adhesive

  • (152813); Iridescent Rhinestone Basic Jewels (158130); Real Red Faux Linen

  • Ribbon (158129)


Measurements:

  • Blushing Bride Card Base: 8 ½” x 5 ½”, scored and folded at 4 ¼”

  • Sweet Talk Designer Series Paper: 5 ¼” x 2 ½”

  • Basic White Insert Layer: 5 ¼” x 4”

  • Ribbon: 18”

  • Scrap piece of Basic White for stamping and die cutting.


Instructions:

Adhere your Sweet Talk Designer Series Paper to the bottom of your Blushing

Bride card base using Stampin’ Seal, ensuring you leave a 1/8” border on three sides.

Using one of the heart stamps, stamp a heart in the centre of the circle die cut

using Blushing Bride Ink, first stamping onto a scrap piece of paper and then onto the circle. This will create a light image. Then, do the same with stamping parts of the heart around the sides of the circle.

Using Real Red Ink, stamp the ‘UR CUTE’ sentiment overtop the centre heart.

In the bottom right-hand corner of the scalloped rectangle, stamp the sentiment using Real Red Ink. Stamp the sentiment using the Masking Technique, which is when you place a piece of masking tape over the parts of the stamp you don’t wish to use. Just remember to remove the tape before you stamp!

Wrap a piece of Real Red Faux Linen Ribbon around the centre of the scalloped circle and adhere by tying a bow on the left hand side. Then, adhere the rectangle to your card with Stampin’ Dimensionals.

Adhere your circle sentiment piece beside the bow using Stampin’ Dimensionals.

Embellish with 5 Iridescent Rhinestone Basic Jewels to finish off the card.


~*~*~*~*~

To order any of Stampin' Up's products you can go directly to my online store - www.stampingwithmaureen.stampinup.net  and click on SHOP NOW.  Please use the Hostess Code 2FKZNR64 through Jan. 31, 2022 to get full benefits from me -

~*~*~*~*~ 

  *NOTE: If your personal order is not part of a current party and you are ordering over $150 in merchandise - please do not use this code; as your order without the code will qualify you to earn a minimum of 10% in hostess benefits.   

 ~*~*~*~*~

If you don't currently have a demonstrator, and would like a catalog or to learn more about Stampin' Up! and our products, please email me at crazystampinglady@gmail.com
Wednesday, January 5, 2022

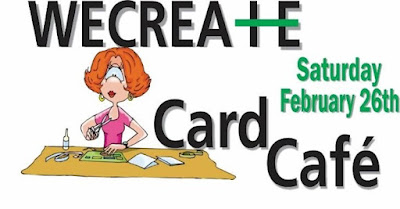
We Create Card Cafe!! Come join the fun!

ALL my local peeps in Arizona - 
Grab a friend and join us for a fun card making event!
No experience necessary! 
9th annual event!

9AM - 11AM or 11AM - 1PM
COST: $20.00

You will get to create 5 handmade cards! 
(no experience even remotely necessary!) 
Come explore some fun tools and stamps you may not have used before! 
There will also be drawings, snacks and goodie bags! 
Go ahead, take a few hours out of your busy life to hang out with us and do something creative for a change! You’re worth it! 
At Grace Church, 2010 S Hwy 89, Chino Valley! 
Some of our Demonstrators may have handmade items for sale, so bring a little extra cash with you to shop! Each attendee is asked to bring a nonperishable food item to donate to the Chino Valley Food Bank. This helps us keep costs down and supports our community too!

Payments can be made through Zelle (most major banks), Venmo or by mailing a check! Contact Shelli for more info! 928-533-5899 

You will need to RSVP to reserve your spot by email or text. 
Once payment is made, your spot is secured! 
Mail checks to: Shelli Deckard 
 660 Harding Road Chino Valley AZ 86323
For Venmo, use @ShelliDeckard, Zelle payments can be made to email address: Shellideckard724@ gmail.com 
Choose 9a.m. or 11a.m. time slot.
You will need a dry adhesive runner of your own to complete the cards. Easily acquired through your demonstrator, Walmart or craft stores. 

Sunday, January 2, 2022

Share It Sunday!! Free Tutorial - Hello Ladybug


It's time to share another great tutorial - a SNEAK PEEK of new products from the upcoming catalog and SAB  that being Jan. 4, 2022.  Enjoy!!

Happy 2022! Welcome to a new year of creativity!!

~*~*~*~*~

Click HERE to find and print your tutorial sheet.

Hello Ladybug

All images © 1990-2022 Stampin’ Up!®

Supplies:

Stamp Sets: Hello Ladybug Bundle (157699)

  • Card Stock and Paper: Basic Black (121045); Basic White (159276);

  • Designer Series Paper Assortment Regals (155227)

  • Stamp Pads: Real Red Ink (147084); Memento Ink (132708)

  • Tools: Paper Trimmer (152392); Paper Snips Scissors (103579); Mini Stampin

  • Cut & Emboss machine (150673); Simply Scored Scoring Tool (122334); Bone

  • folder (102300) 

  • Miscellaneous: Multipurpose Glue (110755); Black Stampin Dimensionals

  • Combo Pack (150893); Layering Circles (151770); Red Rhinestone Basic

  • Jewels (146924); White Frayed Ribbon (158138)

Measurements:

  • Basic White – 5 ½ x 8 ½ , scored at 4 ¼ and burnish with bone folder, scrap

  • for sentiment, white circle, and ladybug. 

  • Basic Black – 3 7/8 x 5 1/8, scrap for scallop circle

  • DSP – 3 ¾ x 5

  • Ribbon: 6 1/2 inches

Instructions:

Stamp the sentiment and cut apart with snips.

  1. Stamp ladybug body with black ink and wings with red and black and punch out.

  2. Glue together.

  3. Cut white circle with the circle that is just a little bigger than ladybug,

  4. Cut black scallop with next largest die, running both thru the

  5. cut & emboss machine. Glue together.

  6. Glue DSP and black piece together, wrap the white ribbon around and secure

  7. with scotch tape. Adhere to the card base using black dimensionals.

  8. Layer ladybug on the circles with glue. Adhere the medallion to the card base

  9. as shown with black dimensionals. Make sure dimensionals are straddling

  10. the ribbon and not on the ribbon. 

  11. Glue sentiment strips to card and put red rhinestones on the ladybug antennae.


~*~*~*~*~

To order any of Stampin' Up's products you can go directly to my online store - www.stampingwithmaureen.stampinup.net  and click on SHOP NOW.  Please use the Hostess Code TC6V9JKH through Jan. 3, 2022 to get full benefits from me -

~*~*~*~*~ 

  *NOTE: If your personal order is not part of a current party and you are ordering over $150 in merchandise - please do not use this code; as your order without the code will qualify you to earn a minimum of 10% in hostess benefits.   

 ~*~*~*~*~

If you don't currently have a demonstrator, and would like a catalog or to learn more about Stampin' Up! and our products, please email me at crazystampinglady@gmail.com