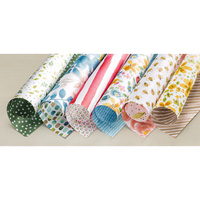
So one of the demonstrations I did at the downline meeting was showing how to make these great little DSP samplers. Stampin' Up! has some of the most amazing Designer Series Papers - but what I've learned over the years is that the catalog does not do it justice. You really need to touch and see the paper in person. So these are easy to make - the first one is strips of DSP showing all 12 designs on the front (our packages are 12 sheets - 2 of each 2 sided design - for 12 designs total). I cut these strips 2" and then as follows for this sampler - 7" 6.5" 6" 5.5" 5" 4.5" 4" 3.5" 3" 2.5" 2" and 1.5" the laid them down as shown - stapled together and tape a little topper over to hide the staple.
The advantage to this style is you can compare all 12 designs together to see what mixes and matches best for your projects. The disadvantage is you can only get one sampler out of a 2" strip of each DSP. Here are the backs of the papers - which will be repeats of the other side.
So another way to do it is to cut you strips of each 2" and then as follows - 6", 5", 4", 3", 2" and 1". The advantage here is that you can get two samplers our of your 2" strip and the disadvantage is that they are only seeing one side of the DSP.....
And will need to flip it over to see the backsides of the papers. But either way works!
I finished it off with a little label with the name of the DSP, Item #, Description and Price, so if customers want to order the package - the info is right there.
So hoped you like that little tip - I think it is a great demo tool to use at your workshops. Have fun making them! ~Maureen
Here are the products used to make this project -


No comments:
Post a Comment