Tuesday, February 28, 2017

Valentine's Fun!!!

Before February was over I thought I'd share a bit of our Valentine's fun here.  My youngest grand-daughter just turned 7 and she had to decorate her box and make her Valentine's - so she hit Grandma's stash.  Here she is with her box covered with doilies and butterflies!
She and her Mom did it together as well as made all of her valentines and attached ring pops!
Here they are close-up!
Then for school we pulled out my Paper Pumpkin kit and added some little cupid's arrows to her hair -
And to Big sister Paisley's hair too.  It must have been early morning - because Paisley looks tired - but I thought the hair was super cute!
Now - we can proceed to March - lol!!  See you all soon! ~Maureen

Monday, February 27, 2017

I have a CASE of Juana.....

Yup - that's right - this card was totally cased from Juana Ambida from Australia - I absolutely love it!  You can see the calendars we made earlier with the same design here - http://crazystampinglady.blogspot.com/2017/01/january-anything-but-card-abc-class.html
It is so bright and cheery and just makes me smile - perfect for birthdays, congrats - or any celebration!!!
Hope you liked it too - see you soon!  ~Maureen
Click on any image below to go directly to my online store - 

Saturday, February 25, 2017

Here a chick ..... there a chick

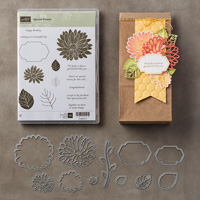
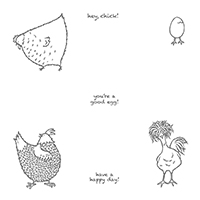
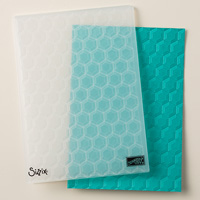
I just can't get enough of this "Hey Chick" Sale-a-bration set - it is so much fun to play with!  The other day I showed you how I made a chicken wire background - just by pushing my cardstock base down on the Hexagon folder - and I loved the look.  But this next card uses the dynamic folder by inking it up and running it through the Big Shot - you still get that same chicken wire look - but with the hexagon's embossed!
You can see it even better below.  For chicken wire, you need to be sure you ink the side that just has the little lines raised up.  If you do the other side - you'll get an entirely different look! 
How adorable is that!!??!!
Here's the envelope below - you all know I hate naked envelopes - and how fun would it be to see this in your stack of mail?
 My original design had the sentiment stamped on some Vanilla Satin ribbon.  It stamped on beautifully - but by a short time later it had bled (see my proto-type below)!  I love the idea - but might have to seal the ribbon before stamping on it next time.  So I switched it up to cardstock!
 So - do you need this set yet????  You can get it FREE with any online order of $50 or more (pre-S&H and tax) at my website - www.stampingwithmaureen.stampinup.net    
Please be sure to use the Hostess Code 4A4WS9QD
Stop back soon!  ~Maureen
Click on any link below to go directly to my online store!

Thursday, February 23, 2017

Hey Chick!

I am in love with this amazing "Hey Chick" set that you can get FREE during Sale-a-bration with any $50 purchase.   It is absolutely the cutest thing.  I'm not one for the corney - quirky sets - usually, but this one has won me over.  Here's the picture I posted on Facebook and Instagram a while back while I was sitting and coloring at Starbucks - and I wanted to show you what I did with those images I colored. 
After coloring them with SU's new watercolor pencils, I cut them apart, and made these adorable cards for my TEAM achievers!
The background is make by inking up the Hexagons Dynamic Textured embossing folder with Soft Suede ink and then pressing it down on my card base - using it like I would a stamp.  It is perfect for making the impression of Chicken Wire!  I just tapped here and there - not worrying about whether or not the pressure was perfect.
Here you can see the card and I did the same thing with the embossing folder on the outside of the envelope!  I just love the look of these - with their funky little colorful birds.  Hope you like them too!
See you soon with some more cards made with this set.  Wanna get your own set FREE - just place an online order of $50 or more (pre S&H and tax) and add "Hey Chick" as your free choice.  You can order at www.stampingwithmaureen.stampinup.net - and PLEASE use HOSTESS code - 4A4WS9QD ~Maureen
To order - just click on any image below to go directly to my online store - 

Friday, February 10, 2017

Earning Alaska Blog Hop - Dragonfly easel card from January CLUB

So - I'm part of a wonderful group of Stampin' Up! demonstrators determined to earn the Incentive Trip from SU! this year - that will take us on a cruise to Alaska.  As part of that group we are doing a series of blog hops now through October - this month we're featuring some of the new stamps from the Occasions mini and Sale-a-bration!  When it came time to pick what I wanted to feature - it was a no-brainer - it had to be the Dragonfly Dreams bundle.  When I saw this in the catalog - it was instant LOVE!
So I'm featuring the card we made in January at our Technique Clubs - it uses the Acrylic Block Smash background technique - which I think is just amazing with this set. Gives it that surreal look that is perfect with Dragonflies! That along with the shimmery white cardstock gold thread behind and the scattered gems - makes it feel almost magical.  Even more lovely in person.
This picture below is kind of bright due to the flash - but I wanted to show how we colored the wings below with the same colors from the background - it shows through just enough to look beautiful.
Below, from the side,  you can see it is a standard easel card.  Start with an 4 1/4" by 11" base and score at 5 1/2" and again at 8".  You can see then the the layers on top are adhered only to part of the base  - that is what allows you to do the easel and stand up  your image.  I'll be posting more on the Acrylic Block Smash technique soon - so be sure to stop back!
Hope you like this card - now please hop along to the next stop on this amazing Blog Hop - See you soon!! ~Maureen

CLICK ON ANY OF THE BLOG HOP LINKS BELOW TO GO RIGHT TO THAT BLOG -
Maureen Rauchfuss
 YOU ARE HERE 

Monday, February 6, 2017

A couple Christmas Trees....

Found these pictures in my blog folder - and I don't think I ever posted them - so I think today is the day!  I made these for two different classes - but both the same framelits and DSP.  Simple, quick cards for the holidays - hope you like them!
Card one with gems! Tree cut out of DSP.
View of cards and envelope.
Card two - similar but with some frayed gold thread.
Close up so you can see we used the negative over DSP for this card.
  See you soon!!! ~Maureen