

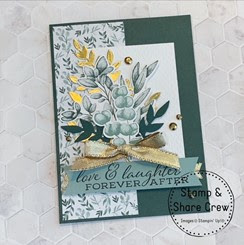
It's time to share another great tutorial - I've been focusing on the holidays - but life still goes on, so sharing a card that would be perfect for a December anniversary with it's rich greens and gold. We can't forget all our other special occasions -
~*~*~*~*~
Click HERE to find and print your tutorial sheet.
Forever Fern
All
images © 1990-2021 Stampin’ Up!®
·
Stamp Sets: Forever Fern Cling Stamp Set (152559)
·
Card Stock and Paper: Soft Succulent Card Stock
or (CS) (155776); Evening Evergreen Card Stock (155574); Basic White Card Stock
(159276); Fold Foil Sheets (132622); Ever Eden 12” x12” Specialty Designer
Series Paper (DSP) (159996)
·
Stamp Pads: Evening Evergreen Classic
Stampin’ Pad (155576); Soft Succulent Evergreen Classic Stampin’ Pad (155778);
Early Expresso Evergreen Classic Stampin’ Pad (147114)
·
Tools: Forever Flourishing dies (152714);
Tailored Tag Punch (145667) Tasteful Textile 3D Embossing Folder (152718)
·
Miscellaneous: Gold 3/8” (1CM) Shimmer
Ribbon (156470); Gilded Gems (152478); Stampin’ Dimensionals (104430); Stampin’
Seal Adhesive (152813); Mini Glue Dots (103683)
Measurements:
Evening Evergreen (card base): 8 1/2” x 5 1/2”, scraps to die cut
·
Basic White: 3” x 4 1/4”, scraps to stamp and die cut
·
Soft Succulent3: 1” x 4”
·
DSP: White and green leaves pattern 5 1/4” x 2”
·
Gold Foil: scraps to die cut
·
Ribbon: 12”
Instructions:
1. Fold the card base in half
using a bone folder to have a crisp fold
2. Glue the DSP onto the card
front using Stampin’ Seal
3. Emboss the Basic White
Cardstock using the tasteful textile 3D embossing folder and glue this piece to
the card front
4. Stamp the leaves in Soft
Succulent and Evening Evergreen ink onto the scraps of Basic White CS
5. Due cut the stamped images
and the leaves in Evening Evergreen and the Gold Foil Sheets using the Forever
Flourishing dies
6. Glue the leaves onto your
card front as shown in the card picture
7. Stamp the sentiment with
Early Espresso Ink pad onto the Soft Succulent Strip and cut out the banner
ends using the Tailored Tag Punch
8. Glue a piece of Gold Shimmer
Ribbon behind the sentiment and cut the ends with your scissors
9. Glue the Banner/Sentiment to
the card front using Stampin’ Dimensionals
10. Make a Bow with the Gold
Shimmer Ribbon and glue to the card front using Mini Glue Dots
11. Add a few Gilded Gems to finish off your card.
~*~*~*~*~
To order any of Stampin' Up's products you can go directly to my online store - www.stampingwithmaureen.stampinup.net and click on SHOP NOW. Please use the Hostess Code TC6V9JKH to get full benefits from me -

~*~*~*~*~
~*~*~*~*~
No comments:
Post a Comment