~*~*~*~*~
Click HERE to find and print your tutorial sheet.
Flower Cart
All images © 1990-2024
Stampin’ Up!®
Supplies:
· Stamp Sets: Flower Cart (162776)
·
Cardstock and Paper:
Basic White (159276); Mossy Meadow (133676); Petal Pink (146985)
·
Stamp Pads:
Crumb Cake (147116); Early Espresso (147114); Mossy Meadow (147111); Petal Pink
(147108)
·
Tools: Flower
Cart Dies (162780); Basics Borders Dies (155558); Everyday Details Dies
(162864); 2” Circle Punch (133782); Stampin’ Cut & Emboss Machine (149653);
Paper Trimmer (152392);
·
Miscellaneous: Stampin’
Dimensionals (104430); Stampin’ Seal Adhesive (152813); Multipurpose Liquid
Glue (110755); Linen Thread (104199); Blooming Pearls (162238)
Measurements:
· Mossy Meadow: 4 1/4” x 11”, scored at 5 1/2”, 3” x 3”
·
Basic White: 4 14” x 3 1/4”, 4” x 5
1/4” (for inside)
·
Petal Pink: Two strips 4 1/4” x 1”
Instructions:
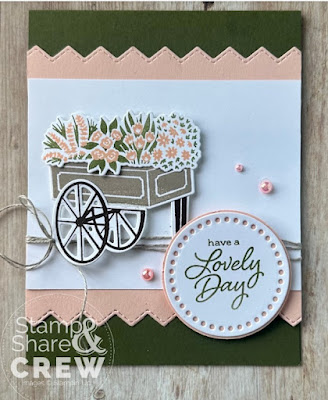
1. Stamp the flower cart with Crumb Cake Ink, and the wheels with Early Espresso Ink. Stamp the flowers (this is a two-part stamp) with Mossy Meadow and Petal Pink inks. Die cut all the stamped images.
2.
Stamp the sentiment with Mossy Meadow
Ink, and die cut with the second to smallest circle from the Everyday Details
Dies. Punch out a Petal Pink circle with the 2” Circle Punch and adhere behind
the sentiment.
3.
Die cut two borders from the Petal
Pink strips and adhere to the back of the Basic White Cardstock.
4.
Wrap the Linen Thread three times
around the Basic White panel and attach it to the card base.
5.
Adhere the wheels and the front leg to
the flower cart with a small amount of liquid glue. Attach the flowers and adhere the whole cart
to the card front with Dimensionals.
6.
Attach the sentiment with Dimensionals
and embellish with Blooming Pearls.
~*~*~*~*~
Order the above bundle in the month of March 2024, and all of my profits from the sale will go to support Doors of Hope ministry in Murfreesboro, TN – see more about this incredible ministry here –
Doors of Hope | (opendoorsofhope.org)
Plus - you will receive a special full bundle tutorial of additional card ideas – that you can use to create wonderful projects. Tutorial bundle will be sent out as soon as possible – usually the Sunday after your purchase.
~*~*~*~*~


No comments:
Post a Comment