Sunday, December 31, 2023

Share it Sunday! Free tutorial - Darling Details

 
It's Sunday - the last Sunday of 2024 - and time to share another great card and free tutorial!   So the holidays are basically over - and it's time to start thinking about all the other wonderful events we celebrate - like birthdays.  I love this card - the black and white designer paper really makes it pop - and it has a fun little fold.  I  hope you like it!
Darling Details #161371 $54.00

Click HERE to find and print your tutorial sheet.

Darling Details

All images © 1990-2023 Stampin’ Up! ®

Supplies:

·       Stamp Sets: Darling Details (161368); So Sincere (162283)

·       Card Stock: Basic White (159276); Basic Black (121045); 12x12 Designer Series Paper Zoo Crew (161304);

·       Stamp Pads: Versamark (102283);

·       Tools: Darling Details Dies (161370); Adhesive Paper (152334); Deckled Rectangles (159173)

·       Miscellaneous: Paper Trimmer (152392); Paper Snips Scissors (103579); Stampin’ Dimensionals (104430); Stampin’ Seal (152813); Stampin Seal + (149699); Stampin’ Cut & Emboss Machine (149653); Stampin’ Mini Dimensionals (144108); Heat Tool (129053); Basics Embossing Powders (155554); Stampin Blends Combo Pack Poppy Parade (154958); Classic Matte Dots (158146)

Measurements:

·       Basic Black: 5-1/2” x 10-1/8” scored parallel to the short side at 4-1/4”, 5-3/4”, 7-1/4”, and 8-3/4”

·       Designer Series Paper Zoo Crew: (2) 1-3/8” x 5-3/8”, 1-1/8” x 5-3/8”

·       Basic White: 2” x 5 3/8”

Instructions:

1.    Cut a piece of Basic Black Card Stock 5 ½” x 10 1/8” and score parallel to the short side at 4-1/4”, 5-3/4”, 7-1/4”, and 8-3/4”.

2.    Cut piece of Zoo Crew Designer Series Paper (2) 1-3/8” x 5-3/8”, 1-1/8” x 5-3/8

3.    Cut a piece of Basic White Card Stock 2” x 5 3/8.

4.    Fold the Basic Black Card to form the column (do not adhere yet) as shown so you know which panel will be the front and have the sentiment as shown. Then stamp sentiment in Versamark and emboss with white embossing powder and heat tool.

5.    Fold the Basic Black Card stock to form the column but again do NOT adhere. Get an idea of where you want to adhere the inside Basic White Card Stock panel for the inside sentiment. Then adhere it.

6.    After doing steps 5 and 6. Fold the Basic Black Card Stock to form the column and adhere with Stamp Seal + -- adhere the back panel to form the column as shown.

7.    Adhere the three Zoo Crew Designer Series Paper pieces to the columns as shown.

8.    Die cut the smallest Deckled Rectangle and stamp sentiment in Versamark and emboss with White Embossing powder with the heat tool. Adhere to inner White Card piece.

9.    On Basic White Card Stock stamp flowers in Versamark and emboss with Black Embossing Powder and heat tool.

10. Adhere Adhesive Paper to Basic White and Basic Black Card Stock and die cut out leaves.

11. Color several of the flowers with the Stampin Blends Poppy Parade.

12. Adhere flowers and leaves to the column and inside of the card as shown using Stampin Seal and Stampin Dimensionals

13. Add embellishments.

~*~*~*~*~

You can check in the SHOP NOW tab at the top of this page to find my current hostess code at any time.

To order any of Stampin' Up's products you can go directly to my online store - www.stampingwithmaureen.stampinup.net  and click on SHOP NOW.  Please use the Hostess Code UF36DW4Z through December 31, 2023 to get full benefits from me-


*NOTE: If your personal order is not part of a current party and you are ordering over $150 in merchandise - please do not use this code; as your order without the code will qualify you to earn a minimum of 10% in hostess benefits.  

~*~*~*~*~

Bundle Bonus for December 2023

Countryside Corners #161472 $47.75*

~*~*~*~*~*

Product available at time of offering.

Cost shown is in the U.S. Market for December 2023 – Price will vary in other Stampin’ Up! markets.

Order the above bundle in the month of December, and all of my profits from the sale will go to support Doors of Hope ministry in Murfreesboro, TN – see more about this incredible ministry here –

Doors of Hope | (opendoorsofhope.org)

Plus - you will receive a special full bundle tutorial of additional card ideas – that you can use to create wonderful projects.  Tutorial bundle will be sent out as soon as possible – usually the Sunday after your purchase.

 ~*~*~*~*~

If you don't currently have a demonstrator and would like a catalog; or would like to learn more about Stampin' Up! and our products, please email me at crazystampinglady@gmail.com

*Note: Product pricing varies by market.  Check with your local demonstrator if you are not in the U.S. to find out your cost.  Product active to purchase at the time of this post.
_________________________________________

Always Stamping, Maureen - the Crazy Stamping Lady!

Sunday, December 24, 2023

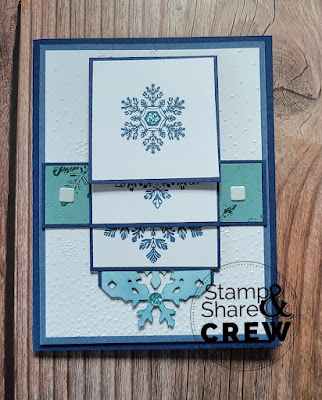
Share it Sunday! Free tutorial - Sparkling Snowflakes

 
It's Sunday - and time to share another great card and free tutorial !   Sharing a fun winter snowflake waterfall card.  Love these, and the Sparkling Snowflake tag topper punch works great for making the pull tab.  I  hope you like it!
Sparkling Snowflakes #162165 $41.25

Click HERE to find and print your tutorial sheet.

Sparkling Snowflakes

All images © 1990-2023 Stampin’ Up!®

Supplies:

 Stamp Sets: Sparkling Snowflakes (162158); Sparkling Snowflakes Bundle (162165)

·       Card Stock and Paper:  Night of Navy (100867); Misty Moonlight (153081); Basic White (159276); Snowflake Magic 12” x 12” Specialty Designer Series Paper (162147)

·       Stamp Pads: Misty Moonlight (153118)

·       Tools: Sparkling Snowflakes Tag Topper Punch (162164);  Take Your Pick (144107)

·       Miscellaneous: Snowflake Sky 3D Embossing Folder (162026); Round & Square Brads (155570); Blending Brushes (153611); Adhesive-Backed Glitter Sequins (162029); Stampin’ Pierce Mat (126199); Wink of Stella (141897); Tear & Tape Adhesive (154031);  Stampin’ Dimensionals (104430); Stampin’ Seal Adhesive (152813); Multipurpose Liquid Glue (110755)

Measurements:

 Night of Navy: 8 ½” x 5 ½”, 3 3/8” x 1 1/8”, 7 ¾” x 2”, 2 ¼” x 2 ¼” (3)

  • Misty Moonlight: 5 ¼” x 4”
  • Basic White:  5” x 3 ¾”, 1 7/8” x 4 ¾”, 2 1/8” x 2 1/8” (3)
  • Snowflake Magic DSP: 3 ¾” x 1”

 Instructions:

 1.    Score and fold the Night of Navy 8 ½” x 5 ½” for your card base.

2.    Score the Night of Navy of Navy 7 ¾” x 2” at 1 ½, 2 ¼” and 3”.  Fold these score marks using your Bone Folder so they are all going in the same direction.  At top in the 1” section on the inside of this piece, add two pieces of Tear & Tape.  Do not pull off the backing yet.

3.    Emboss the Basic White piece for the front and adhere that with the Misty Moonlight.  Adhere together the Snowflake Magic DSP and piece of Night of Navy.  Holding the embossed piece, the DSP layer and the scored Night of Navy piece, line all of these up so that the 1” section that has the adhesive is lined up to meet the bottom of the DSP layer.  You are trying to get everything centered on the front of the card.  

4.    Using the Stampin’ Pierce Mat underneath, and using the paper piercing end of your Take Your Pick Tool, poke one hole in the center of each side of the DSP.  Insert the brads so they are going through all four layers.  The brads are the only thing holding the DSP to the card front.     

5.    Stamp the snowflakes on the 3 pieces of Basic White cardstock using Misty Moonlight ink.  Adhere these to the matching 3 pieces of Night of Navy cardstock.

6.    Stamp snowflakes and a greeting on the 1 7/8” x 4 ¾” piece of Basic White.  Adhere this to the long “tail” piece that will be the inside of your waterfall.  Do not adhere over the score mark at the top.  Using the builder punch, punch through both pieces to create the snowflake pull at the bottom.  It will take a little strength to punch through both pieces of cardstock and you may need to stand up to do it. 

7.    Using a blending brush, lightly add some shading to the bottom of the tail and the snowflake pull so it sets it apart from the white card front.

8.    Slip the “tail” end of the waterfall under the DSP layer.  Remove the adhesive you added in step 2 from the back of the 1” part and adhere this to the DSP layer.  You should be able to now pull the snowflake tail and see the waterfall parts move down.

9.    Starting at the bottom (or last snowflake), adhere the snowflake pieces being sure not to adhere over the score marks.  It is best to go directly below them. Use the Tear & Tape to adhere them. 

10. Add sequins to the centers of the snowflakes and the one on the tail.  Use Wink of Stella on the stamped snowflakes on the inside.

11. Stamp the inside and envelope to match.

~*~*~*~*~

You can check in the SHOP NOW tab at the top of this page to find my current hostess code at any time.

To order any of Stampin' Up's products you can go directly to my online store - www.stampingwithmaureen.stampinup.net  and click on SHOP NOW.  Please use the Hostess Code UF36DW4Z through December 31, 2023 to get full benefits from me-


*NOTE: If your personal order is not part of a current party and you are ordering over $150 in merchandise - please do not use this code; as your order without the code will qualify you to earn a minimum of 10% in hostess benefits.  

~*~*~*~*~

Bundle Bonus for December 2023

Countryside Corners #161472 $47.75*

~*~*~*~*~*

Product available at time of offering.

Cost shown is in the U.S. Market for December 2023 – Price will vary in other Stampin’ Up! markets.

Order the above bundle in the month of December, and all of my profits from the sale will go to support Doors of Hope ministry in Murfreesboro, TN – see more about this incredible ministry here –

Doors of Hope | (opendoorsofhope.org)

Plus - you will receive a special full bundle tutorial of additional card ideas – that you can use to create wonderful projects.  Tutorial bundle will be sent out as soon as possible – usually the Sunday after your purchase.

 ~*~*~*~*~

If you don't currently have a demonstrator and would like a catalog; or would like to learn more about Stampin' Up! and our products, please email me at crazystampinglady@gmail.com

*Note: Product pricing varies by market.  Check with your local demonstrator if you are not in the U.S. to find out your cost.  Product active to purchase at the time of this post.
_________________________________________

Always Stamping, Maureen - the Crazy Stamping Lady!

Monday, December 18, 2023

FREE Mystery Boxes with purchase now through December 31, 2023!

 The return of MYSTERY boxes!! Limited time special.

I’M destashing my retired products and that means an awesome december deal for you – treat yourself to a great christmas present with this bonus!

Meet the order requirement below, and I will put together an awesome mystery box for you – the Mystery Boxes will be filled with retired Stampin’ Up! products and on their way to you.  

THE MYSTERY BOXES CAN INCLUDE ANY OF THE FOLLOWING ITEMS…

-Stamp Sets (If I have the dies or punches to go with a set it will be included with

     the set.)  Some of these may be gently used, but everything is still functional.

-Dies and/or punches

-Designer Series Papers*

-Embellishments*

-Ribbons*

-Embossing folders

-3D gift boxes

-Paper Pumpkin kits/partial kits*

-Specialty cards and Envelopes

-Card bases

-Project Life products

-Paper pumpkin stamp sets

-Coloring items

-Handmade cards, tags, gifts and kits ….

And more – if Stampin’ Up! sold it – then it might be in there.

ORDER ANY TIME December 14 – december 31, 2023!

It’s basically BOGO in value.  An online order of $50 earns a box of product worth a minimum of $50 in retired product; an online $100 order earns a box of product worth a minimum of $100 in retired product; that’s how it works.  For every order $50 or more you will earn at least the equivalent in retired merchandise value – how great is that!  You’ll get a box each time you order at one of those levels during my promotion dates.  Value is based on approximate original sales value in the previous catalogs.

You must order online through my website www.stampingwithmaureen.stampinup.net and use Hostess Code: UF36DW4Z   All boxes will be shipped out ASAP after you order, but with the holidays – please allow up to four weeks for arrival.  I will notify you when your box has shipped.  

*Note: some items may be partial packages rather than full; and all 12”x12” DSP will be cut to 6” x 6” for mailing purposes; products included are as is – no returns. But I promise each package will be filled with crafty fun!  Finally I reserve the right to discontinue the promotion if I run out of appropriate retired merchandise – but note, I do not foresee that happening.

Who's up for a Mystery???

Sunday, December 17, 2023

Share it Sunday! Free tutorial - Season of Chic

 
It's Sunday - and time to share another great card and free tutorial !   Moving on to a fun and quick thank you - perfect to send out this time of year.  It uses the collage technique for a wonderful snowy background - I  hope you like it!
Season of Chick #158810 $27.00 (USD)*

Click HERE to find and print your tutorial sheet.

Season of Chic

All images © 1990-2023 Stampin’ Up!®

Supplies:

·       Stamp Sets: Season of Chic (158810)

·       Card Stock (CS) and Paper: Basic White CS (100730); Misty Moonlight CS (153081)

·       Stamp Pads: Misty Moonlight Ink (153118)

·       Tools: Modern Oval Punch (162234)

·       Miscellaneous: Night of Navy Bordered Ribbon (160581); Adhesive Backed Snowflake Asst. (162129 - OE); Rhinestone Basic Jewels (144220); Stampin’ Dimensionals (104430); Stampin’ Seal Adhesive (152813)

Measurements:

·       Basic White CS: 8 1/2” x 5 1/2”, 4” x 5 1/4”, 1” x 3 ½”

·       Misty Moonlight CS: 2” x 3” (punch)

·       Night of Navy Bordered Ribbon: 3 1/2”

Instructions:

1.    On the large Basic White layer using Misty Moonlight Ink randomly stamp the different sentiments of choice.  Then randomly stamp the snowflake image – stamping off one first each time.  Layer this layer centered, onto the card base using Stampin’ Dimensionals.

2.    On the small rectangle stamp the word “thanks” with Misty Moonlight ink toward the right side.  Punch the Modern Oval punch out of the Misty Moonlight piece; then layer the thanks on top of it centered. Tie a knot around the left end of the Basic White rectangle – then pop this entire piece up on the card with dimensionals as shown.

3.    Randomly place several white snowflakes on the card – then add a Rhinestone Basic Jewel to the center of each one.

4.    Finish the inside of card and envelope as desired.

 ~*~*~*~*~

You can check in the SHOP NOW tab at the top of this page to find my current hostess code at any time.

To order any of Stampin' Up's products you can go directly to my online store - www.stampingwithmaureen.stampinup.net  and click on SHOP NOW.  Please use the Hostess Code UF36DW4Z through December 31, 2023 to get full benefits from me-


*NOTE: If your personal order is not part of a current party and you are ordering over $150 in merchandise - please do not use this code; as your order without the code will qualify you to earn a minimum of 10% in hostess benefits.  

~*~*~*~*~

Bundle Bonus for December 2023

Countryside Corners #161472 $47.75*

~*~*~*~*~*

Product available at time of offering.

Cost shown is in the U.S. Market for December 2023 – Price will vary in other Stampin’ Up! markets.

Order the above bundle in the month of December, and all of my profits from the sale will go to support Doors of Hope ministry in Murfreesboro, TN – see more about this incredible ministry here –

Doors of Hope | (opendoorsofhope.org)

Plus - you will receive a special full bundle tutorial of additional card ideas – that you can use to create wonderful projects.  Tutorial bundle will be sent out as soon as possible – usually the Sunday after your purchase.

 ~*~*~*~*~

If you don't currently have a demonstrator and would like a catalog; or would like to learn more about Stampin' Up! and our products, please email me at crazystampinglady@gmail.com

*Note: Product pricing varies by market.  Check with your local demonstrator if you are not in the U.S. to find out your cost.  Product active to purchase at the time of this post.
_________________________________________

Always Stamping, Maureen - the Crazy Stamping Lady!