Friday, September 24, 2021

SF 2021 September - Say it with Sentiments Blog Hop


Be sure to hop through all the blogs on the list near the bottom for tons of wonderful inspiration as we celebrate "Saying it with Sentiments!!"
 ~*~*~*~*~

If you've come from Teri's post - her projects are awesome! So, if not, be sure you swing back to see her.  

I started with a card from a set that uses some wonderful sentiments - "Positive Thoughts."  

There are only a few sentiments in this set - but they are very meaningful - plus, all of the images for this card are from this set.  I just love everything about it.  The layer with the zig-zag edge was made by cutting the front off of one of our ombre - in-color treat bags, fun huh!

Then, since we are concentrating on sentiments - a while back I shared how I keep extra sentiments in a clear cello bag - so if I need one in a hurry - it is ready to go.  Here's what I mean.


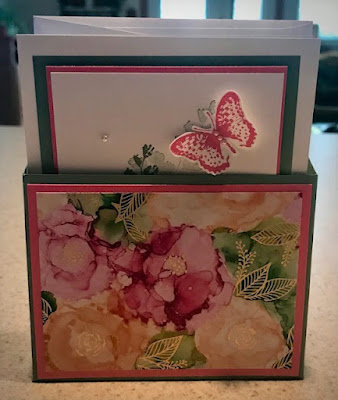
So I decided to make a little box to store them in - 

I just drew out a little pattern measuring how wide and tall I wanted it, as well as the depth - 


then made this - 


It works perfect - and bonus - this size could also hold four A2 cards with envelopes for gift giving.

Finally - just because we are on the topic of sentiments I wanted to share this bonus hostess offering till the end of September - the "In Your Words" stamp set in the back of the Sale-a-bration catalog.  You can get it free with any $300 order or workshop and it is amazing -

I hope you can read all those great sentiments - but there is one special one for me.  I created this card using last month's Paper Pumpkin kit - and it is a birthday card -


But I am over a week late in sending it - so here is what I did -


How great is that.  I will keep this sentiment forever as it is perfect to stamp on the flap of any birthday card going out late.  Believe me, it will be well used! 

  Hope you liked my homage to sentiments :)

 ~*~*~*~*~

Once again, thank you for stopping by my blog.   Maybe you got some inspiration for creating something wonderful of your own.  I would love it if you would leave me a comment below and stop back soon.  Don't forget to click through on each name below to see even more awesome ideas - starting with Melissa's.  

See you soon with more ideas!  

~*~*~*~*~
September 2021 SF Hoppers - check them all out by clicking on their links for some more great ideas - and please leave comments if you can, to show appreciation for their work :)

~*~*~*~*~
To order any of Stampin' Up's products you can go directly to my online store -www.stampingwithmaureen.stampinup.net and click on SHOP NOW.  Please use the Hostess Code below to get full benefits from me - SDUHMDAT*
*NOTE: If your personal order is not part of a current party and you are ordering over $150 in merchandise - please do not use this code; as your order without the code will qualify you to earn a minimum of 10% in hostess benefits.   

 ~*~*~*~*~

If you don't currently have a demonstrator, and would like a catalog or to learn more about Stampin' Up! and our products, please email me at crazystampinglady@gmail.com
Stop back soon for some more creative fun and inspiration.     ~Maureen

Wednesday, September 15, 2021

Paper Crafting Blog Hop September 2021 - Happy Birthday!


Welcome to our Paper Crafting Blog Hop for September 2021 featuring talented Independent Stampin’ Up! Demonstrators. Fellow demonstrators from all over the globe including the USA, United Kingdom and Australia are participating. We have a wide array of fun projects and design styles to share with you this month - all spotlighting projects that represent - a Happy Birthday!

~*~*~*~*~
So I wanted to make something bright and cheery - because that is what birthday's should be. I had a vision in my head - that did not translate exactly to my card - but I still like it.

I made a JoyFold card (one of my very favorite folds). The top part with the bow opens from left to right -

And then the flap at the left opens right to left revealing the inside of the card. I did not stamp an inside sentiment, as I like to write in this entire area - but there is room if you wanted to.
Tips to Create this card:
Large base of Basic White is 4 1/4" x 8 1/2" scored on the long side at 3". Small base that open left to right is 3" x 8" scored on the long side at 4".
Black layers are 2 3/4" x 4"; 4" x 5 1/4"; 2 3/4" x 3 3/4" and 2 1/8" x 3 1/8" - refer to pictures for placement.
Heart DSP is 2 1/2" x 3 3/4" and 3 3/4" x 5" - watch pattern to try and line up.
Green DSP is 2 5/8" x 3 5/8".
Sentiment layer is 2" x 3".
Black & White Gingham ribbon colored with a Real Red blend - wrapped around green layer - before adhering. Sentiment is adhered to black then popped up on dimesionals. Bow of the ribbon attached with a glue dot to the left on the small base as shown.
Products used: Basic White CS (159276); Basic Black CS (121045); Pattern Party Hostess Reward (155426); Black & White Gingham Ribbon (156485); Stampin' Blends Real Red (154899); Tuxedo Black Memento Ink ( ); Granny Apple Green Ink (147095); Biggest Wish Stamp Set (155052)

~*~*~*~*~

I hope you enjoyed my post and would love it if you'd leave me a comment. Now click on through to the rest of those hopping this month to see all of their wonderful creations! ~Maureen

Shirley Merker

Tracy Held

Annette McMillan

Julia Quinn

Sue Boerner

Terri Stewart

Maureen Rauchfuss - YOU ARE HERE!

Krissi Hannahs

Joy Nelson


~*~*~*~*~

To order any of Stampin' Up's products you can go directly to my online store - www.stampingwithmaureen.stampinup.net  and click on SHOP NOW.  Please use the Hostess Code SDUHMDAT to get full benefits from me -
~*~*~*~*~ 
  *NOTE: If your personal order is not part of a current party and you are ordering over $150 in merchandise - please do not use this code; as your order without the code will qualify you to earn a minimum of 10% in hostess benefits.   

 ~*~*~*~*~

If you don't currently have a demonstrator, and would like a catalog or to learn more about Stampin' Up! and our products, please email me at crazystampinglady@gmail.com

Sunday, September 12, 2021

August Paper Pumpkin - Alternative Project #4

So my Paper Pumpkin class for the August kit is over and I can continue to share what we did as our alternatives - here is the FINAL alternative project from class - an adorable set of magnetic bookmarks.

Below is one open so you can see the magnet placement.  I use the magnet sheets for on the back of business cards as they are flat - the roll ones drive me crazy!


Tips
To duplicate you would use four colored strips with the flagged ends that punch out; two of the large and two of the small butterflies of your choice; and 5 1/2" of the ribbon from the kit, plus a piece of Blackberry Bliss cardstock 4 3/4" x 3" and a piece of Just Jade cardstock 4 1/2" x 2 3/4".   

For the base - securely adhere the ribbon around the Just Jade layer and securely attach to Blackberry Bliss layer (I used our sticky strip).  I then adhered the poem above to the back, for gift-giving.  Next fold each of the strips in half - attach a butterfly to the front top with a glue dot, add a gem to each butterfly - and attach two magnetic pieces to the inside as show.  You now have four little magnetic bookmarks to use or give.  Here they are all four of my alternatives for the August 2021 kit, featured one at a time the last four days. Check them all out - and have fun!!
Let me know if you have any questions and stop back soon.  ~Maureen

~*~*~*~*~
To order any of Stampin' Up's products you can go directly to my online store -www.stampingwithmaureen.stampinup.net and click on SHOP NOW.  Please use the Hostess Code below to get full benefits from me - SDUHMDAT*

*NOTE: If your personal order is not part of a current party and you are ordering over $150 in merchandise - please do not use this code; as your order without the code will qualify you to earn a minimum of 10% in hostess benefits.   

 ~*~*~*~*~

If you don't currently have a demonstrator, and would like a catalog or to learn more about Stampin' Up! and our products, please email me at crazystampinglady@gmail.com
Stop back soon for some more creative fun and inspiration.     ~Maureen

Saturday, September 11, 2021

August Paper Pumpkin - Alternative Project #3

So my Paper Pumpkin class for the August kit is over and I can continue to share what we did as our alternatives - here is the third project - 


Tips
To duplicate you would used the card base from the kit that is light teal (maybe Pool Party); a piece of Blackberry Bliss cardstock cut 5" x 3 3/4"; two of the small butterflies shown; the lacy punch out of the flowers and butterflies together; Wink of Stella and small gems colored with the Blackberry Bliss Blends (or you could use plain gems).  

No stamping on the outside of this one.  Adhere the lacy punch out with small bits of Tombow glue on the back; to the Blackberry Bliss layer (note it will hang over a bit).  Pop this up onto your card base with dimensionals.  Fold the wings of the little butterflies up a bit and adhere with a glue dot.  Use Wink of Stella on the centers of the flowers.  That was it - finish inside as you like and pick the envelope from the kit you want to go with it.
Let me know if you have any questions and stop back soon to see the final alternative project for this kit.  ~Maureen

~*~*~*~*~
To order any of Stampin' Up's products you can go directly to my online store -www.stampingwithmaureen.stampinup.net and click on SHOP NOW.  Please use the Hostess Code below to get full benefits from me - SDUHMDAT*

*NOTE: If your personal order is not part of a current party and you are ordering over $150 in merchandise - please do not use this code; as your order without the code will qualify you to earn a minimum of 10% in hostess benefits.   

 ~*~*~*~*~

If you don't currently have a demonstrator, and would like a catalog or to learn more about Stampin' Up! and our products, please email me at crazystampinglady@gmail.com
Stop back soon for some more creative fun and inspiration.     ~Maureen

Friday, September 10, 2021

August Paper Pumpkin - Alternative Project #2

So my Paper Pumpkin class for the August kit is over and I can continue to share what we did as our alternatives - here is the second project - 


Tips
To duplicate you would use the card base from the kit that is Melon Mambo and speckled; the rectangle layer that is Bermuda Bay and speckled; the large butterfly cut in half; small purple butterfly and the long strip of the sentiment shown cut apart as shown..  I used discontinued embellishments - but you could use plain gems or pearls as is or colored with one of our Blends.  

No stamping on the outside of this one.  Just place and adhere the elements as shown and add your gems.  The sentiment pieces were put onto dimensionals and the small butterfly adhered with a glue dot.  That was it - finish inside as you like and pick the envelope from the kit you want to go with it.
Let me know if you have any questions and stop back soon to see the rest of my alternative projects for this kit.  ~Maureen

~*~*~*~*~
To order any of Stampin' Up's products you can go directly to my online store -www.stampingwithmaureen.stampinup.net and click on SHOP NOW.  Please use the Hostess Code below to get full benefits from me - SDUHMDAT*

*NOTE: If your personal order is not part of a current party and you are ordering over $150 in merchandise - please do not use this code; as your order without the code will qualify you to earn a minimum of 10% in hostess benefits.   

 ~*~*~*~*~

If you don't currently have a demonstrator, and would like a catalog or to learn more about Stampin' Up! and our products, please email me at crazystampinglady@gmail.com
Stop back soon for some more creative fun and inspiration.     ~Maureen

Thursday, September 9, 2021

August Paper Pumpkin - Alternative Project #1

So my Paper Pumpkin class for the August kit is over and I can now share what we did as our alternatives - here is the first project - 

Tips
To duplicate you would use the card base from the kit that has the swirls and spots on it; the yellow tag from the kit; the swirly flowers that are on the same sheet as the large butterfly and your stamps, ink pad and  sequins.  

We just stamped the butterflies as shown.  Added the swirly flowers with just a little Tombow glue on the back.  Laid the tag on the card at an angle and then stamped the sentiment so it went straight with the card.  After stamping - we stapled a 3" piece of ribbon (your choice) folded in half to the top and popped the tag up on dimensionals.  That was it - finish inside as you like and pick the envelope from the kit you want to go with it.
Let me know if you have any questions and stop back soon to see the rest of my alternative projects for this kit.  ~Maureen

~*~*~*~*~
To order any of Stampin' Up's products you can go directly to my online store -www.stampingwithmaureen.stampinup.net and click on SHOP NOW.  Please use the Hostess Code below to get full benefits from me - SDUHMDAT*

*NOTE: If your personal order is not part of a current party and you are ordering over $150 in merchandise - please do not use this code; as your order without the code will qualify you to earn a minimum of 10% in hostess benefits.   

 ~*~*~*~*~

If you don't currently have a demonstrator, and would like a catalog or to learn more about Stampin' Up! and our products, please email me at crazystampinglady@gmail.com
Stop back soon for some more creative fun and inspiration.     ~Maureen

Thursday, September 2, 2021

Quick and Easy Four Angle Cards!

I am such a clean and simple girl when it comes to card-making.  And - I always, always do four cards when I do one - and put the extras in my bin.  So this way of making four angle cards so appeals to me.

It's a great way to showcase and use up some of your hoarded DSP!
And the great thing is you can embellish just a little, or a lot - and use for any type of sentiment that tickles your fancy!
Here is a close up of the bee one - on this one, I popped up the bee above my sentiment with a dimensional.
You can see a video on how I made these cards if you have a Facebook account - here is the link -  


Hope you think they are as fun to make as I do!

~*~*~*~*~
To order any of Stampin' Up's products you can go directly to my online store -www.stampingwithmaureen.stampinup.net and click on SHOP NOW.  Please use the Hostess Code below to get full benefits from me - SDUHMDAT*

*NOTE: If your personal order is not part of a current party and you are ordering over $150 in merchandise - please do not use this code; as your order without the code will qualify you to earn a minimum of 10% in hostess benefits.   

 ~*~*~*~*~

If you don't currently have a demonstrator, and would like a catalog or to learn more about Stampin' Up! and our products, please email me at crazystampinglady@gmail.com
Stop back soon for some more creative fun and inspiration.     ~Maureen