Pages

Sunday, February 19, 2023

Share it Sunday! Free tutorial - Friendly Gnomes!

 
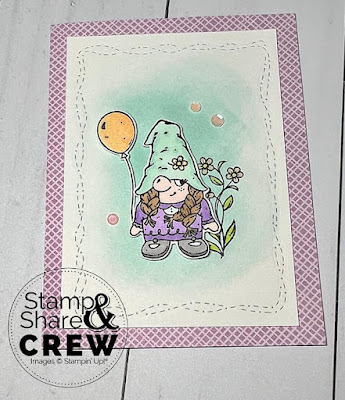
It's Sunday - and time to share another great card and free tutorial! Today I'm sharing this adorable Gnome card - I put off getting this set till recently, and now I love it.  Planning to try some fun St. Paddy's Day cards with it this weekend.   Hope you like it!  Enjoy!

#160714 Friendly Gnomes $24.00*

~*~*~*~*~

Click HERE to find and print your tutorial sheet.

Friendly Gnomes

All images © 1990-2023 Stampin’ Up!®

Supplies:

·       Stamp Sets: Friendly Gnomes Stamp Set (160714)

·       Card Stock and Paper: Fresh Freesia (155613); Basic White (159276); Butterfly Kisses 6” x 6” Designer Series Paper (DSP) (159112)

·       Stamp Pads: Tuxedo Black Memento Ink (132708); Highland Heather Classic Ink (147103); Pool Party Classic Ink (147107)

·       Tools: Gnome Dies (159625); Stitched with Whimsy Dies (155314); Highland Heather Stampin’ Blends (154887); Pool Party Stampin’ Blends (154894); Pale Papaya Stampin’ Blends (155519); Smoky Slate Stampin’ Blends (154904); Granny Apple Green Stampin’ Blends (154885); Small Blending Brushes (160518)

·       Miscellaneous: Pastel Adhesive-Backed Sequins (160387); (Stampin’ Dimensionals (104430); Stampin’ Seal Adhesive (152813); Wink of Stella Glitter Brush (141897)

Measurements:

·       Fresh Freesia CS: 8 1/2" x 5 1/2” and score at 4 1/4” on the long side

·       Basic White CS: (2) 3 1/2” x 4 7/8”; die cut with 2nd to largest Stitched with Whimsy Die

·       Basic White CS: Scrap for stamping balloon and gnome – cut out

·       Fresh Freesia DSP: 4 1/4" x 5 1/2”

Instructions:

 1.    Adhere Fresh Freesia DSP to card front

2.    Stamp Gnome and Balloon; color with Stampin’ Blends and die cut or fussy cut

3.    Die cut (1) Basic White CS with Stitched with Whimsy die

4.    Blend Pool Party Classic Ink onto Basic White layer to create halo image, keeping the ink lighter in the area that you will stamp your flower directly onto this CS

5.    Stamp flower image and color in with Stampin’ Blends

6.    Adhere layer to card front

7.    Adhere gnome and balloon images using Stampin’ Dimensionals

8.    Add Wink of Stella Glitter Brush to balloon

9.    Add Pastel Adhesive-Backed Sequins to card front

10. Stamp sentiment in Highland Heather Classic Ink onto second Basic White CS piece and adhere to inside of card.

~*~*~*~*~
You can check in the SHOP NOW tab at the top of this page to find my current hostess code at any time.

To order any of Stampin' Up's products you can go directly to my online store - www.stampingwithmaureen.stampinup.net  and click on SHOP NOW.  Please use the Hostess Code SAQTJGWV through February 28, 2023 to get full benefits from me-

*NOTE: If your personal order is not part of a current party and you are ordering over $150 in merchandise - please do not use this code; as your order without the code will qualify you to earn a minimum of 10% in hostess benefits.   

~*~*~*~*~


Proceeds from every purchase of this bundle during the month of November 2022 go to support the
  Doors of Hope Ministry in Murfreesboro, TN 
Plus, you will receive a Bonus Tutorial PDF (sent within a week following your order) featuring great projects and ideas with this bundle. You must order using the hostess code above to get these benefits!

 ~*~*~*~*~

If you don't currently have a demonstrator, and would like a catalog or to learn more about Stampin' Up! and our products, please email me at crazystampinglady@gmail.com

*Note: Product pricing varies by market.  Check with your local demonstrator if you are not in the U.S. to find out your cost.  Product active to purchase at the time of this post.
_________________________________________

Always Stamping, Maureen - the Crazy Stamping Lady!


No comments:

Post a Comment