Pages

Sunday, August 28, 2022

Share it Sunday! Free tutorial - Tech Support

 It's Share it Sunday!  So, initially this set did not appeal to me at all - but as I saw all the great creations made with it, it grew on me.  And who doesn't know a computer nerd or two lol.  So just look at this fun creation - I know exactly who I plan to send it to.  Enjoy this fun card and be sure to access your free tutorial at the link below!
#159101 Tech Support $20.00*

~*~*~*~*~

Click HERE to find and print your tutorial sheet.

Tech Support

All images © 1990-2022 Stampin’ Up!®

 
Supplies:

 Stamp Sets: Tech Support (159101)

·       Card Stock and Paper: Basic White THICK (159229); Basic Gray (121044); Basic Black (121045); Basic White (159276; Metallic & Shimmer Specialty Paper (159909); Silver Foil Specialty Pack (156457

·       Stamp Pads: Memento Tuxedo Black Ink Pad (132708)

·       Tools: Splatters & Stripes 3D Embossing Folder (157980); Stylish Shapes Dies (159183); Paper Trimmer (152392); Bone Folder (102300); Paper Snips (103579); Take Your Pick Tool (144107)

·       Miscellaneous: Classic Matte Dots (158146); Metallic Mesh Ribbon (153550); Mini Stampin’ Dimensionals (144108); Stampin’ Seal Adhesive (152813); Stampin’ Cut & Emboss Machine (149653)

 Measurements:

 ·       Basic White THICK: 8½” x 5½” (scored at 4¼”)

·       Basic White: 2¼” x 2¼”

·       Basic Gray: 2½” x 2½:

·       Basic Black: 4” x 5¼”;

·       Metallic & Shimmer: 1½” x 5”

·       Silver Foil: 1” x 5” (two pieces)

 Instructions:

 1.    Emboss Silver Foil pieces. Adhere strips to Basic Black. Wrap ribbon and tie in a loopy bow. Adhere all to card front.

2.    Stamp sentiment and keyboard keys using Memento Tuxedo Black Ink. Die cut using Stylish Shapes dies. Adhere to Basic Gray and Basic Black squares. Adhere to card front using Mini Stampin’ Dimensinals. Stamp keyboard keys inside card.

3.    Sprinkle Classic Matte Dots on card front using Take Your Pick Tool.

 ~*~*~*~*~

You can check in the SHOP NOW tab at the top of this page to find my current hostess code at any time.

To order any of Stampin' Up's products you can go directly to my online store - www.stampingwithmaureen.stampinup.net  and click on SHOP NOW.  Please use the Hostess Code 7VKPZTXT through August 31, 2022 to get full benefits from me-

$50 purchase in August will earn you a FREE SAB item at that level; as well as my FREE Pretty Projects tutorial PDF.    

*NOTE: If your personal order is not part of a current party and you are ordering over $150 in merchandise - please do not use this code; as your order without the code will qualify you to earn a minimum of 10% in hostess benefits.   

~*~*~*~*~
 August Bundle Bonus
Proceeds from every purchase of this bundle during the month of August 2022 go to support the  Agape House of Prescott AZ 
Plus, you will receive my Bundle Bonus Tutorial and it's Sale-a-bration so you will earn a free Sale-a-bration product!!  Order using the hostess code above to get these benefits!

 ~*~*~*~*~

If you don't currently have a demonstrator, and would like a catalog or to learn more about Stampin' Up! and our products, please email me at crazystampinglady@gmail.com

*Note: Product pricing varies by market.  Check with your local demonstrator if you are not in the U.S. to find out your cost.  Product active to purchase at the time of this post.

Friday, August 26, 2022

SF-2022 August Blog Hop - All About the Paper!

Be sure to hop through all the blogs on the list near the bottom for tons of wonderful inspiration as we create projects that are all about the paper!
 ~*~*~*~*~  

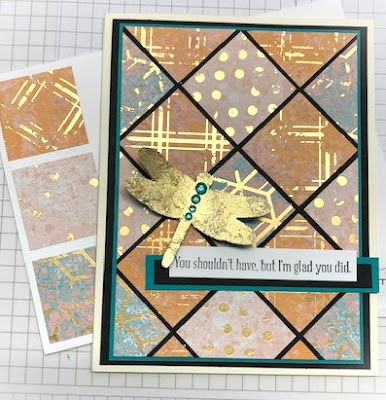
This month our projects are focusing on the amazing papers Stampin' Up! has to offer you - I wanted to make something fun - that featured a few DSP paper designs - so look at this cute set -


I love the new Texture Chic DSP - it is beautiful colors and patterns and splashes of gold.  
Texture Chic DSP #158808  $15.00*
So I decided to showcase it by using the patterns in fun ways.  The card is made of 1 1/4" squares places in a fun diagonal pattern.

Then added a great sentiment, gilded and gemmed dragonfly - and even a few squares to my envelope. 

Then for my 3D project I started with a cute little notebook from the Dollar store (they come in a pack of three).

I wrapped a piece of Vanilla cardstock on the front, top and down a 1/4" on the back - using extra sticky Tear and Tape to hold it.

Then finished decorating the front with similar layers and 1" x 2 3/4" strip of the Designer Series paper and added my initial inside a diamond shape, using the Alphabest Stamp Set.  
Alphabest Set #158884 $22.00*

I just love how it turned out, and who can resist another notepad - right?!?

Hope you enjoyed these fun projects that for sure made the Designer Series Paper the star of the show.

 ~*~*~*~*~

Once again, thank you for stopping by my blog.   Maybe you got some inspiration for creating something wonderful of your own.  I would love it if you would leave me a comment below and stop back soon.  Don't forget to click through on each name below to see even more awesome ideas.

To order any of Stampin' Up's products you can go directly to my online store - www.stampingwithmaureen.stampinup.net  and click on SHOP NOW.  Please use the Hostess Code 7VKPZTXT through August 31, 2022 to get full benefits from me -

~*~*~*~*~ 

  *NOTE: If your personal order is not part of a current party and you are ordering over $150 in merchandise - please do not use this code; as your order without the code will qualify you to earn a minimum of 10% in hostess benefits.   

 ~*~*~*~*~

If you don't currently have a demonstrator, and would like a catalog or to learn more about Stampin' Up! and our products, please email me at crazystampinglady@gmail.com

*Note: Product pricing varies by market.  Check with your local demonstrator if you are not in the U.S. to find out your cost.  Product active to purchase at the time of this post.

Sunday, August 21, 2022

Share it Sunday! Free tutorial - Painted Pheasant

 
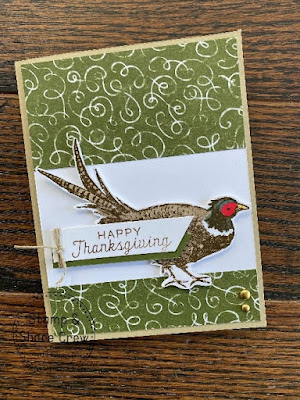
 It's Sunday!  So I associate this time of year with fall - maybe not officially - but it's coming and that makes me so happy.   I associate pheasants with fall also, not sure why but they certainly are fall colors.  This is such a nice way to send your Thanksgiving wishes to family and friends.  Enjoy this beautiful card!

#159846  Painted Pheasant $19.00*
~*~*~*~*~

Click HERE to find and print your tutorial sheet.

Painted Pheasant

All images © 1990-2022 Stampin’ Up!®


Supplies:

·       Stamp Sets: Painted Pheasant (159846)

·       Card Stock and Paper: Crumb Cake (120953); Mossy Meadow (133676); Basic White (159276); Rustic Harvest 12” x 12” Designer Series Paper (DSP) (159633)

·       Stamp Pads: Soft Suede (147115)

·       Tools: Paper Snip Scissors (103579)

·       Miscellaneous: Brushed Metallic Dots (156506); Crumb Cake Stampin’ Blends Combo Pack (154882); Soft Succulent Stampin’ Blends Combo Pack (155521); Poppy Parade Stampin’ Blends Combo Pack (154958); Daffodil Delight Stampin’ Blends Combo Pack (154883); Baker’s Twine Essentials Pack (155475); Stampin’ Dimensionals (104430); Multipurpose Liquid Glue (110755)

 Measurements:

·       Crumb Cake: 8 1/2” x 5 1/2”, scored at 4 1/4”

·       Basic White: 4” x 5 1/4" – cut 2; 5/8” x 2 3/4"; 3 1/2" x 4 1/4"

·       Mossy Meadow: 5/8” x 2 3/4"

·       DSP: 1” x 4”; 2” x 4”

·       Ribbon: approximately 10” length

 Instructions:

 1.    With Multipurpose Liquid Glue, attach the Basic White panels to front and inside of Crumb Cake card base.

2.    Adhere the two strips of DSP to the card front with Multipurpose Liquid Glue.

3.    Use Soft Suede ink to stamp the pheasant and words onto Basic White. 

4.    Use Stampin’ Blends to color the pheasant. 

5.    Fussy cut the pheasant with Paper Snip Scissors, and position to card front with Stampin’ Dimensionals.

6.    Use Paper Snip Scissors to angle the right side of the word panel and the strip of Mossy Meadow.  Use Multipurpose Liquid Glue to secure – offset slightly.    

7.    Wrap a length of Crumb Cake twine from the Baker’s Twine Essentials Pack around this panel and tie in a knot. 

8.    Attach word panel to the card front with Dimensionals. 

Embellish with Brushed Metallic Dots.   

~*~*~*~*~
You can check in the SHOP NOW tab at the top of this page to find my current hostess code at any time.

To order any of Stampin' Up's products you can go directly to my online store - www.stampingwithmaureen.stampinup.net  and click on SHOP NOW.  Please use the Hostess Code 7VKPZTXT through August 31, 2022 to get full benefits from me-

$50 purchase in August will earn you a FREE SAB item at that level; as well as my FREE Pretty Projects tutorial PDF.    

*NOTE: If your personal order is not part of a current party and you are ordering over $150 in merchandise - please do not use this code; as your order without the code will qualify you to earn a minimum of 10% in hostess benefits.   

~*~*~*~*~
 August Bundle Bonus
Proceeds from every purchase of this bundle during the month of August 2022 go to support the  Agape House of Prescott AZ 
Plus, you will receive my Bundle Bonus Tutorial and it's Sale-a-bration so you will earn a free Sale-a-bration product!!  Order using the hostess code above to get these benefits!

 ~*~*~*~*~

If you don't currently have a demonstrator, and would like a catalog or to learn more about Stampin' Up! and our products, please email me at crazystampinglady@gmail.com

*Note: Product pricing varies by market.  Check with your local demonstrator if you are not in the U.S. to find out your cost.  Product active to purchase at the time of this post.

Wednesday, August 17, 2022

Paper Crafting Blog Hop August 2022 - DSP Spotlight!


Welcome to our Paper Crafting Blog Hop for August 2022 - featuring talented Independent Stampin’ Up! Demonstrators from all over the globe including the USA, United Kingdom and Australia. We have a wide array of projects and design styles to share with you this month - all spotlighting - Stampin' Ups! amazing Designer Series Paper!

~*~*~*~*~

For my project I chose to use the beautiful Hues of Happiness DSP - such an absolutely delightful paper. So versatile and so bright and cheery.

#158822 Hues of Happiness DSP

I wanted to make a card that just shouted it's beauty - so I made this accordion fold card and the entire base is made out of the DSP -


You start with a base of DSP that is 5 1/2" x 12" and score along the long side at 1 3/4", 4 3/4" and 7 3/4"; then fold back and forth to get the base that will fit into a medium envelope.

Next decorate as desired - so I die cut some pieces from the Painted Label Dies; fussy cut some flowers from the Hues of Happiness DSP; and added sentiment from the Happiness Abounds set, with Flirty Flamingo ink.

#159238 Happiness Abounds set

Here is the front of the card opened wide - with a couple spots to add some personal thoughts -
And the back of the card - just as beautiful -

So there you go - it really is all about the Designer Series Paper!

I hope you got some inspiration from this card. Thank you so much for stopping by and I would love any comments!

~*~*~*~*~

Now click on through to the rest of those hopping with me this month to see all of their wonderful creations and inspirations! ~Maureen

~*~*~*~*~
To order any of Stampin' Up's products you can go directly to my online store - www.stampingwithmaureen.stampinup.net  and click on SHOP NOW.  Please use the Hostess Code 7VKPZTXT to get full benefits from me; and don't forget - it's Sale-a-Bration so every $50 or more purchase will earn you a FREE Sale-a-bration product -
*~*~*~*~ 
  *NOTE: If your personal order is not part of a current party and you are ordering over $150 in merchandise - please do not use this code; as your order without the code will qualify you to earn a minimum of 10% in hostess benefits.   

 ~*~*~*~*~

If you don't currently have a demonstrator, and would like a catalog or to learn more about Stampin' Up! and our products, please email me at crazystampinglady@gmail.com

*Note: Product pricing varies by market.  Check with your local demonstrator if you are not in the U.S. to find out your cost.  Product active to purchase at the time of this post.

Sunday, August 14, 2022

Share it Sunday! Free tutorial - A Fish and a Wish


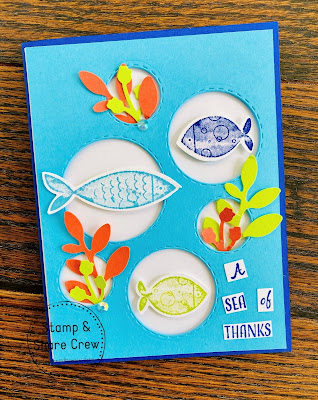
 It's Sunday!  Sharing a cool card this weekend - just got this set and have been playing a bit with it!! Enjoy!
158993 A Fish and a Wish $21.00*

~*~*~*~*~

Click HERE to find and print your tutorial sheet.

A Fish & A Wish

All images © 1990-2021 Stampin’ Up!®

Supplies:

·       Stamp Sets: A Fish & A Wish (158993); A Fish & A Wish Bundle (159001)

·       Card Stock and Paper: Basic White (159276); Tahitian Tide (159261); Calypso Coral (122925); Parakeet Party (159259); Starry Sky (159263)

·       Stamp Pads: Parakeet Party (159208); Tahitian Tide (147101); Starry Sky (159212)

·       Tools: Picture This Dies (155559); Fish Builder Punch (159000); Bough Punch (157711); Paper Snips Scissors (103579)

·       Miscellaneous: Iridescent Rhinestone Basic Jewels (158130); Stampin’ Dimensionals (104430); Multipurpose Liquid Glue (110755); Mini Glue Dots (103683)

 Measurements:

 ·       Starry Sky: 8 ½” x 5 ½, scored at 4 ¼”

·       Basic White: 4” x 5 ¼” – cut 2; 1” x 11” (fish & words)

·       Parakeet Party: 4” x 5 ¼” (or just use scraps)

·       Calypso Coral: 4” x 5 ¼”  (or just use scraps)

Instructions:

1.    Begin with a Starry Sky card base.

2.    Attach the Basic White panels to the front and inside of the card.

3.    Use the Stampin’ Cut & Emboss Machine and the Picture This Dies to crop the Tahitian Tide panel.

4.    Stamp the fish onto the Basic White Card Stock strip– one large fish in Tahitian Tide ink; one small fish in Starry Sky and one small fish in Parakeet Party. 

5.    Use the Fish Builder Punch to punch out the three fish. 

6.    Use the leftover strip of Basic White Card Stock to stamp words with Starry Sky ink and use Paper Snips Scissors to trim close to the words.  Cut words apart. 

7.    Adhere the Tahitian Tide panel to card front with dimensionals.

8.    Attach fish with dimensionals as shown in photo.

9.    Attach the words to the card front with Multipurpose Liquid Glue.

10. Punch the two colors of cardstock with bough punch and use Mini Glue Dots to add to card front, tucking ends under the circles. Embellish card with Iridescent Rhinestone Basic Jewels.

~*~*~*~*~
You can check in the SHOP NOW tab at the top of this page to find my current hostess code at any time.

To order any of Stampin' Up's products you can go directly to my online store - www.stampingwithmaureen.stampinup.net  and click on SHOP NOW.  Please use the Hostess Code 7VKPZTXT through August 31, 2022 to get full benefits from me-

$50 purchase in August will earn you a FREE SAB item at that level; as well as my FREE Pretty Projects tutorial PDF.    

*NOTE: If your personal order is not part of a current party and you are ordering over $150 in merchandise - please do not use this code; as your order without the code will qualify you to earn a minimum of 10% in hostess benefits.   

~*~*~*~*~
 August Bundle Bonus
Proceeds from every purchase of this bundle during the month of August 2022 go to support the  Agape House of Prescott AZ 
Plus, you will receive my Bundle Bonus Tutorial and it's Sale-a-bration so you will earn a free Sale-a-bration product!!  Order using the hostess code above to get these benefits!

 ~*~*~*~*~

If you don't currently have a demonstrator, and would like a catalog or to learn more about Stampin' Up! and our products, please email me at crazystampinglady@gmail.com

*Note: Product pricing varies by market.  Check with your local demonstrator if you are not in the U.S. to find out your cost.  Product active to purchase at the time of this post.