Pages

Sunday, December 26, 2021

Share It Sunday!! Free Tutorial -


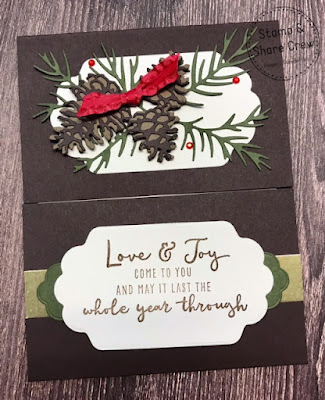
It's time to share another great tutorial - I've been focusing on the holidays - and today sharing a beautiful card that is perfect for a New Year's wish.   

Happy 2022 - it's right around the corner!

~*~*~*~*~

Click HERE to find and print your tutorial sheet.

Christmas to Remember

All images © 1990-2021 Stampin’ Up!®

Supplies:

 ·       Stamp Sets: Christmas to Remember (156300)

·       Card Stock and Paper: Card Stock (CS) Early Espresso (119686); CS Very Vanilla (101650); CS Mossy Meadow (555555); CS Soft Suede (115318); Gold Foil Sheets (132622)

·       Stamp Pads: Soft Suede Classic Stampin’ Up! Pad (147115)

·       Tools: Christmas Pinecone Dies (156309); Seasonal Labels Dies (156299)

·       Miscellaneous: Real Red 3/8” Mini Ruffled Ribbon (156323); Red Rhinestone Basic Jewels (146924); Stampin’ Seal Adhesive (152813); Multipurpose Liquid Glue (110755); Stampin’ Dimensionals (104430)

Measurements:

 ·       Base Early Espresso: 4 ¼” x 11”

·       Insert Very Vanilla: 4” x 5 ¼”

·       Very Vanilla: 2 pieces 2 ½” x 4”

·       Mossy Meadow: 2 ¾” x 4” and 1” x 4 ¼”

·       Scraps: Soft Suede and Early Espresso for Pinecones

·       Ribbon: Mini Ruffled Real Red: 3”

 Instructions:

 1.    Score the Early Espresso CS base along the long side at 2 ¾” and 8 ¼” to form a gatefold card that opens vertically – adhering the Very Vanilla CS insert to the inside of the card.

2.    Die cut two of the largest label die from the Seasonal Labels Dies out of Very Vanilla CS pieces.  Stamp the “Love and Joy” new year’s sentiment on one of the layers. 

3.    Die cut one of the long labels from the Seasonal Labels Dies out of the thinner strip of Mossy Meadow; approximately 1/3 of the boughs and pinecones layer out of Mossy Meadow snip any excess off; 1 large and 2 small pine cone bases out of Soft Suede; and 1 large and 2 small pine cone layers out of Early Espresso. 

4.    Using Multipurpose liquid glue adhere the pine bough piece to the other Very Vanilla label and adhere this to the front of the top flap of the card.  Adhere the pine cone layers to the pine cone bases in the same manner; and add them to the bough with Stampin’ Dimensionals.

~*~*~*~*~

To order any of Stampin' Up's products you can go directly to my online store - www.stampingwithmaureen.stampinup.net  and click on SHOP NOW.  Please use the Hostess Code TC6V9JKH through Jan. 3, 2022 to get full benefits from me -

~*~*~*~*~ 

  *NOTE: If your personal order is not part of a current party and you are ordering over $150 in merchandise - please do not use this code; as your order without the code will qualify you to earn a minimum of 10% in hostess benefits.   

 ~*~*~*~*~
If you don't currently have a demonstrator, and would like a catalog or to learn more about Stampin' Up! and our products, please email me at crazystampinglady@gmail.com

Friday, December 24, 2021

Merry Christmas from the Crazy Stamping Lady!


  • “But when the fullness of the time came, God sent forth His Son, born of a woman, born under the Law, so that He might redeem those who were under the Law, that we might receive the adoption as sons.” – Galatians 4:4-5
  • May your holidays be filled with blessings and love and unexpected joy!  Here are a few of my Christmas cards this year for your inspiration. ~Maureen
  • ~*~*~*~*~
  • Global Share Fair Card
  • Global Share Fair Card
  • Tutorial Video HERE
  • Tutorial Video HERE
  • Tutorial Video HERE
  • Card from a Christmas Card Class 2021
     
    Tutorial video HERE
  • Stamp & Share - Tutorial Here!
  • Tutorial video HERE
  • Global Share Fair Card
  •  Merry Christmas to all!!!

Sunday, December 19, 2021

Share It Sunday!! - Free tutorial!


It's time to share another great tutorial - I've been focusing on the holidays - and today I just need to sneak in one more Christmas card because I love it oh so much.  And it's not too early to start on next year's cards - right??

~*~*~*~*~

Click HERE to find and print your tutorial sheet.

Sparkle of the Season

All images © 1990-2021 Stampin’ Up!®

Supplies:

·       Stamp Sets: Sparkle of the Season (156518); Bundle (156765)

·       Card Stock and Paper: Crumb Cake (120953); Basic White Thick (159229)

·       Stamp Pads: Uninked Stampin’ Pad & Whisper White Refill (147277); Real Red (147084)

·       Tools: Seasonal Swirls Dies (156564); Bundle (156765); Stitched Rectangle Die (151820); Stitched Stars Dies (150653); Stampin’ Cut & Emboss Machine (149653)

·       Miscellaneous: Mini Stampin’ Dimensionals (144108); Stampin’ Dimensionals (104430); Linen Thread (104199); Multipurpose Liquid Glue (110755); Mini Glue Dots (103683)

Measurements:

·       Crumb Cake: 8 1/2” x 5 1/2” scored at 4 ¼”, 3 ½” x 4 ½” and 3 ½” x 3 ½” (2)

·       Basic White Thick: ½: x 3” and scraps

·       Linen Thread: 10”

Instructions:

1.    Using the Sparkle of the Season stamp set and Whisper White Ink stamp stars on top right corner of card base.

2.    Using the Stitched Rectangle cut the 3” x 4 ¼” stitched rectangle from the 3 ½” x 4 ½” piece of Crumb Cake cardstock and stamp stars randomly with Whisper White ink.

3.    Using the Stitched Star Dies cut a star frame and a stitched star from scrap Basic White Thick cardstock. Attach star frame to card stitched rectangle with Multipurpose Liquid Glue.

4.    Cut two of the star wreaths from 3 ½” x 3 ½” pieces of Crumb Cake cardstock and attach to stitched rectangle with Mini Stampin’ Dimensionals.  Layer wreaths so dimensionals do not show.

5.    Tie Linen Thread around stitched star and attach over wreaths with Mini Glue Dots.

6.    Stamp sentiment using the same stamp set and Real Red ink onto the ½” X 3” piece of Basic White Thick cardstock and attach with Stampin’ Dimensionals.

~*~*~*~*~

To order any of Stampin' Up's products you can go directly to my online store - www.stampingwithmaureen.stampinup.net  and click on SHOP NOW.  Please use the Hostess Code TC6V9JKH to get full benefits from me -

~*~*~*~*~ 

  *NOTE: If your personal order is not part of a current party and you are ordering over $150 in merchandise - please do not use this code; as your order without the code will qualify you to earn a minimum of 10% in hostess benefits.   

 ~*~*~*~*~

If you don't currently have a demonstrator, and would like a catalog or to learn more about Stampin' Up! and our products, please email me at crazystampinglady@gmail.com


Wednesday, December 15, 2021

Paper Crafting Blog Hop December 2021 - Gift Packaging!


Welcome to our Paper Crafting Blog Hop for December 2021 featuring talented Independent Stampin’ Up! Demonstrators. Fellow demonstrators from all over the globe including the USA, United Kingdom and Australia are participating. We have a wide array of fun projects and design styles to share with you this month - all spotlighting projects that represent - Gift Packaging ideas!

~*~*~*~

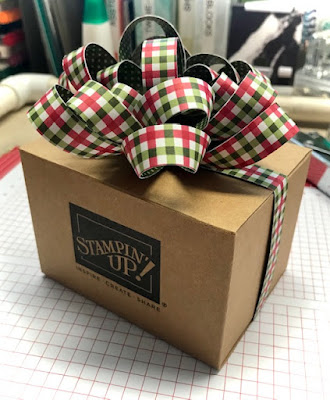
So today's project is a Holiday Gift Packaging idea - that could easily be adapted for any time of the year just by changing out the Paper you use. Start with strips of your favorite DSP -
For this bow all DSP strips are 1/2" wide - and you'll need 3 - 11" long; 3 - 9 1/2" long; 2 - 6" long and 1 - 4" long.
The next thing you will do is fold each piece (except the 4" piece) in half to find the center point. Then loop each end to the center and staple it.
The above image shows one looped and then two attached together with glue dots. Be sure your ends are rounded as shown above, and each piece folded to the center overlaps a bit before stapling. You are going to attach the 3 largest together, then the 3 next largest, then the 2 next largest - criss-crossing them as shown. The 4" piece is stapled together in a circle and attached to the center to finish off the bow. I used only glue dots to attach each layer and it's staying together nicely!
For my packaging I am using the Mini Stampin' Up! boxes that are currently on clearance while supplies last. These are a great little size - you get 8 boxes - 4" x 3" x 2 5/8" when folded together. #149492 - $2.00 a package clearance. My tip is to take your bone folder and made sure all the score lines are creased well before putting them together.
Next you'll want to fold up your box, and I sealed with a piece of tape to hold on top (the bottom can still be opened).

I then decided to use a 1/2" x 12" strip of the DSP to cover the tape and seam. This does not quite meet on the bottom of the box - so you can piece in a piece of the strips you cut up earlier. Add a couple dimensionals to the bottom of your bow -
And attach to your little box on top. If I was gifting this with Stampin' Up! goodies inside - I would be sure to leave it just like this.
Or, if you'd just like to use it as a gift box - that logo is easy to cover - how cute is this a sentiment a couple dies and some holly!
I hope you were inspired by this - and be sure to order the boxes and the punch (on the last chance list) before they are GONE!
~*~*~*~*~
Now click on through to the rest of those hopping with me this month to see all of their wonderful creations and inspirations! ~Maureen

To order any of Stampin' Up's products you can go directly to my online store - www.stampingwithmaureen.stampinup.net  and click on SHOP NOW.  Please use the Hostess Code TC6V9JKH to get full benefits from me -
~*~*~*~*~ 
  *NOTE: If your personal order is not part of a current party and you are ordering over $150 in merchandise - please do not use this code; as your order without the code will qualify you to earn a minimum of 10% in hostess benefits.   

 ~*~*~*~*~

If you don't currently have a demonstrator, and would like a catalog or to learn more about Stampin' Up! and our products, please email me at crazystampinglady@gmail.com

Sunday, December 12, 2021

Share It Sunday!! - Free tutorial!

It's time to share another great tutorial - I've been focusing on the holidays - but life still goes on, so sharing a card that would be perfect for a December anniversary with it's rich greens and gold. We can't forget all our other special occasions -

~*~*~*~*~

Click HERE to find and print your tutorial sheet.

Forever Fern

All images © 1990-2021 Stampin’ Up!®

Supplies:

·       Stamp Sets: Forever Fern Cling Stamp Set (152559)

·       Card Stock and Paper: Soft Succulent Card Stock or (CS) (155776); Evening Evergreen Card Stock (155574); Basic White Card Stock (159276); Fold Foil Sheets (132622); Ever Eden 12” x12” Specialty Designer Series Paper (DSP) (159996)

·       Stamp Pads: Evening Evergreen Classic Stampin’ Pad (155576); Soft Succulent Evergreen Classic Stampin’ Pad (155778); Early Expresso Evergreen Classic Stampin’ Pad (147114)

·       Tools: Forever Flourishing dies (152714); Tailored Tag Punch (145667) Tasteful Textile 3D Embossing Folder (152718)

·       Miscellaneous: Gold 3/8” (1CM) Shimmer Ribbon (156470); Gilded Gems (152478); Stampin’ Dimensionals (104430); Stampin’ Seal Adhesive (152813); Mini Glue Dots (103683)

Measurements:

 Evening Evergreen (card base): 8 1/2” x 5 1/2”, scraps to die cut

·       Basic White: 3” x 4 1/4”, scraps to stamp and die cut

·       Soft Succulent3: 1” x 4”

·       DSP: White and green leaves pattern 5 1/4” x 2”

·       Gold Foil: scraps to die cut

·       Ribbon: 12”

Instructions:


1.    Fold the card base in half using a bone folder to have a crisp fold

2.    Glue the DSP onto the card front using Stampin’ Seal

3.    Emboss the Basic White Cardstock using the tasteful textile 3D embossing folder and glue this piece to the card front

4.    Stamp the leaves in Soft Succulent and Evening Evergreen ink onto the scraps of Basic White CS

5.    Due cut the stamped images and the leaves in Evening Evergreen and the Gold Foil Sheets using the Forever Flourishing dies

6.    Glue the leaves onto your card front as shown in the card picture

7.    Stamp the sentiment with Early Espresso Ink pad onto the Soft Succulent Strip and cut out the banner ends using the Tailored Tag Punch

8.    Glue a piece of Gold Shimmer Ribbon behind the sentiment and cut the ends with your scissors

9.    Glue the Banner/Sentiment to the card front using Stampin’ Dimensionals

10. Make a Bow with the Gold Shimmer Ribbon and glue to the card front using Mini Glue Dots

11. Add a few Gilded Gems to finish off your card. 

~*~*~*~*~

To order any of Stampin' Up's products you can go directly to my online store - www.stampingwithmaureen.stampinup.net  and click on SHOP NOW.  Please use the Hostess Code TC6V9JKH to get full benefits from me -

 ~*~*~*~*~ 

  *NOTE: If your personal order is not part of a current party and you are ordering over $150 in merchandise - please do not use this code; as your order without the code will qualify you to earn a minimum of 10% in hostess benefits.   

 ~*~*~*~*~

If you don't currently have a demonstrator, and would like a catalog or to learn more about Stampin' Up! and our products, please email me at crazystampinglady@gmail.com

Saturday, December 11, 2021

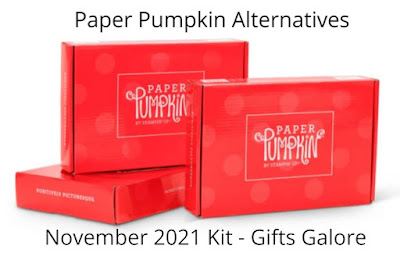
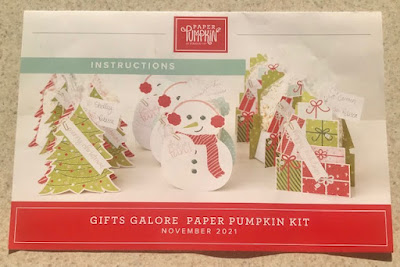
November Paper Pumpkin - Alternative Project #4

 
So my Paper Pumpkin class for the November kit is over and I can continue to share what we did as our alternatives - here is the fourth and final project we did for this kit - a cute little treat holder.
Tips
We started by stamping all over the little treat box portion while flat - "Oh, what fun!" with Shaded Spruce and Flirty Flamingo; and snowflakes with Pool Party.  Then adhered it together with Tear and Tape and placed it into one of the treat bags.  I cut about 1 1/4" off the top of the bag to make it easier for me to reach in and place the treats.    Next I took 1/3 of the white tissue that was in the kit and crumpled it up and put in the bottom of the little treat box - so my candies stood higher.  HINT: save everything from your kit that is practical - I always keep the tissue and use it in various ways.
Then we stamped the striped gift image onto strips of 1" x 3" pieces of copy paper using Pool Party and Flirty Flamingo inks; and added bows with Old Olive and Shaded Spruce inks.  Then putting a glue dot on the back side on each end of the strip, wrapped them around Hershey's nuggets to fill the bag.
Finally we stamped the "Oh, what fun!" onto one of the round tags.  Tied the bag shut with a piece of the green twine; and hung the tag on with one of the little clips.
Voila - all done.  Would make an adorable little place setting treat - or add a gift card for a nice little gift! 
~*~*~*~*~

To order any of Stampin' Up's products you can go directly to my online store -www.stampingwithmaureen.stampinup.net and click on SHOP NOW.  Please use the Hostess Code below to get full benefits from me -
TC6V9JKH

*NOTE: If your personal order is not part of a current party and you are ordering over $150 in merchandise - please do not use this code; as your order without the code will qualify you to earn a minimum of 10% in hostess benefits.   

 ~*~*~*~*~

If you don't currently have a demonstrator, and would like a catalog or to learn more about Stampin' Up! and our products, please email me at crazystampinglady@gmail.com
Stop back soon for some more creative fun and inspiration.     ~Maureen